|
|
| Line 1: |
Line 1: |
|
| | == Open vSwitch == |
| == Introduction == | |
| Throughout, this article will assume the following:
| |
| * You have installed Gentoo or Funtoo in the past.
| |
| ** If you haven't, this article will still serve you well, but please have either the official funtoo, or gentoo install guides open. We move through non-machine-specific bits with little elaboration.
| |
| * Have a T420 or similar machine.
| |
|
| |
|
| Even if you do not have a T420, you may find this guide useful for:
| | Open vSwitch is a production quality, multilayer virtual switch licensed under the open source Apache 2.0 license. It is designed to enable massive network automation through programmatic extension, while still supporting standard management interfaces and protocols (e.g. NetFlow, sFlow, SPAN, RSPAN, CLI, LACP, 802.1ag). In addition, it is designed to support distribution across multiple physical servers similar to VMware's vNetwork distributed vswitch or Cisco's Nexus 1000V. |
| * Nvidia Optimus Cards.
| |
| * Power management.
| |
| * General setup.
| |
|
| |
|
| This installation assumes (For now) that the install is starting from an MS-Windows installation. If you are not on Windows, please add your favourite choice of steps, keep the emphasis on ease of understanding.
| | === Features === |
|
| |
|
| == Getting Started ==
| | The current stablerelease of Open vSwitch (version 1.4.0) supports the following features: |
| You'll want to get yourself running off a LiveCD or LiveUSB to start. This guide will assume liveUSB, since some users find them more difficult to prepare, this is usually due to boot flag issues.
| |
| (Note: ''Live USB restore drives are nice to have in general! The author keeps one in his college binder.'')
| |
|
| |
|
| ==== Windows ====
| | * Visibility into inter-VM communication via NetFlow, sFlow(R), SPAN, RSPAN, and GRE-tunneled mirrors |
| We can use LiLi for this, it provides a nice, simple interface and is fairly reliable: [http://www.linuxliveusb.com/en/download LiLi Download]
| | * LACP (IEEE 802.1AX-2008) |
| | * Standard 802.1Q VLAN model with trunking |
| | * A subset of 802.1ag CCM link monitoring |
| | * STP (IEEE 802.1D-1998) |
| | * Fine-grained min/max rate QoS |
| | * Support for HFSC qdisc |
| | * Per VM interface traffic policing |
| | * NIC bonding with source-MAC load balancing, active backup, and L4 hashing |
| | * OpenFlow protocol support (including many extensions for virtualization) |
| | * IPv6 support |
| | * Multiple tunneling protocols (Ethernet over GRE, CAPWAP, IPsec, GRE over IPsec) |
| | * Remote configuration protocol with local python bindings |
| | * Compatibility layer for the Linux bridging code |
| | * Kernel and user-space forwarding engine options |
| | * Multi-table forwarding pipeline with flow-caching engine |
| | * Forwarding layer abstraction to ease porting to new software and hardware platforms |
|
| |
|
| === SysrescueCD === | | == Configuring Open vSwitch == |
| Grab the version that Suites your needs here: [http://www.sysresccd.org/Download Sysrescue Download]
| |
| Next use LiLi (Or whatever you happen to be using) to flash the image or burn your CD. Reboot, change your boot device, and you'll find yourself at a grub menu.
| |
|
| |
|
| Since the T series are all 64-bit laptops, make sure to boot the 64-bit kernel, as the default is 32-bit.
| | Open vSwitch needs to be compiled with the kernel modules (modules USE flag) for kernel versions <3.3, since 3.3.0 it is included in the kernel as a module named "Open vSwitch" and can be found in kernel at '''Networking Support -> Networking Options -> Open vSwitch'''. Then just emerge openvswitch with |
|
| |
|
| ''But Why?: If we pick 32-bit, later on we won't be able to chroot into our Funtoo's 64-bit stage 3.''
| |
|
| |
| You should see a fairly verbose boot as sysrescueCD scans for modules it requires and starts up. It is safe to simply accept prompt defaults here, unless they are errors.
| |
|
| |
| When you are greeted by the interactive command prompt, enter 'wizard' as prompted, and accept the default entry in the dialogue. This will give us a functioning XFCE desktop environment.
| |
|
| |
| == Partitioning ==
| |
| Partitioning is the only step of this install which provides real risk to data on other operating systems. Be extremely careful if there is something you do not wish to loose. These steps are not foolproof and may result in lost data.
| |
|
| |
| Please be aware that MBR disks only support '''4''' primary partitions. You can solve this by creating an 'extended' partition and adding logical partitions to it. If you are feeling particularly brave try GPT on your disk.
| |
|
| |
| So lets start:
| |
| First open up gparted. You should see it on the taskbar if you're using systemrescueCD. It will scan available drives and show you the partition table. Most users will likely find one of the following to their liking:
| |
|
| |
| ==== Pure Funtoo ====
| |
| You'll likely want:
| |
| <pre> | | <pre> |
| /boot :: EXT2 :: 100mb-500mb
| | # emerge -avt openvswitch |
| ''Note: We choose EXT2 because there is really no good use for a journalled boot partition, but feel free to use EXT4 instead!''
| |
| / :: EXT4 :: 60gb (suggested floor value) - 500+
| |
| swap :: linux-swap :: Your RAM Value (Optional, allows for hibernation)
| |
| </pre> | | </pre> |
| You may wish for a separate /home, which is perfectly legitimate, or any number of other partitions.
| |
|
| |
|
| ==== Dual Boot with Windows ==== | | == Using Open vSwitch == |
| If dual booting with Windows, it is advisable to have Windows installed '''first''' since it will muck with the MBR and possibly want to create it's own boot partition.
| |
| You'll likely want:
| |
| <pre>
| |
| System Reserved :: NTFS :: Whatever windows chooses.
| |
| Windows :: NTFS :: >100gb (If you plan on doing any serious work on windows)
| |
| /boot :: EXT2 :: 100mb-500mb
| |
| Extended Partition -
| |
| / :: EXT4 :: Whatever is left.
| |
| swap :: linux-swap:: Your RAM value. (Optional, allows for hibernation)
| |
| </pre>
| |
| You may also want a separate /home, etc. These will fit into your extended partition without contributing to MBR's 4 partition limit.
| |
|
| |
|
| == Starting the (actual) Install ==
| | These Configs are taken from the Open vSwitch website at http://openvswitch.org and adjusted to funtoo's needs |
| Up until now everything we've done has just been foreplay. Finally we can mount our partitions and get started on the installation!
| |
|
| |
|
| ==== Mounting ==== | | === VLANs === |
| First, lets mount all of our partitions.
| |
| * Make a directory for root. Lets assume '''/mnt/funtoo'''
| |
| <pre>
| |
| mkdir /mnt/funtoo
| |
| </pre>
| |
| * Mount your '/' partition to /mnt/funtoo
| |
| <pre>
| |
| mount /dev/sd## /mnt/funtoo
| |
| </pre>
| |
| * Make a directory for your boot partition.
| |
| <pre>
| |
| mkdir /mnt/funtoo/boot
| |
| </pre>
| |
| * Mount your boot partition.
| |
| <pre>
| |
| mount /dev/sd## /mnt/funtoo/boot
| |
| </pre>
| |
| * Mount anything else you may have made and need. (Not swap)
| |
|
| |
|
| ==== Checking the Date ==== | | ==== Setup ==== |
| Although this may seem super un-important, if you want to avoid lots of spammy warning messages later, checking your date is beneficial.
| |
| <pre>
| |
| date
| |
| </pre>
| |
| If it needs to be set, you'll want something like:
| |
| <pre>
| |
| date 071620002011
| |
| #Fri Jul 16 20:00:00 UTC 2011
| |
| </pre>
| |
|
| |
|
| ==== Fetch a Stage 3 ====
| | * Two Physical Networks |
| Next we need to fetch a tarball containing a barebones stage. We will download the core-i7 architecture version, if you have a core i5 or i3, don't worry, it's all the same.
| | ** Data Network: Eternet network for VM data traffic, which will carry VLAN tagged traffic between VMs. Your physical switch(es) must be capable of forwarding VLAN tagged traffic and the physical switch ports should be VLAN trunks (Usually this is default behavior. Configuring your physical switching hardware is beyond the scope of this document). |
| <pre>
| | ** Management Network: This network is not strictly required, but it is a simple way to give the physical host an IP address for remote access, since an IP address cannot be assigned directly to eth0. |
| cd /mnt/funtoo
| | * Two Physical Hosts |
| wget http://ftp.osuosl.org/pub/funtoo/funtoo-current/x86-64bit/corei7/stage3-current.tar.xz
| | Host1, Host2. Both hosts are running Open vSwitch. Each host has two NICs: |
| </pre>
| | ** eth0 is connected to the Data Network. No IP address can be assigned on eth0 |
| | | ** eth1 is connected to the Management Network (if necessary). eth1 has an IP address that is used to reach the physical host for management. |
| Next lets unpack with
| | * Four VMs |
| <pre>
| | VM1, VM2 run on Host1. VM3, VM4 run on Host2. |
| tar xJpf stage3-current.tar.xz
| | Each VM has a single interface that appears as a Linux device (e.g., "tap0") on the physical host. (Note: for Xen/XenServer, VM interfaces appear as Linux devices with names like "vif1.0"). |
| </pre>
| | [[image:2host-4vm.png]] |
| ''Seriously, don't forget the 'p' option.''
| |
|
| |
|
| If you run 'ls' now, you should see the /mnt/funtoo is fully populated with folders such as lib, home, and proc.
| | ==== Goal ==== |
|
| |
|
| ==== Chroot'ing ====
| | Isolate VMs using VLANs on the Data Network. |
| Now we need to change the ''apparent root'' of our system to our fledgling Funtoo system.
| | VLAN1: VM1, VM3 |
| <pre>
| | VLAN2: VM2, VM4 |
| cd /mnt/funtoo
| |
| mount --bind /proc ./proc
| |
| mount --bind /dev ./dev
| |
| cp /etc/resolv.conf ./etc
| |
| env -i HOME=/root TERM=$TERM chroot /mnt/funtoo /bin/bash --login
| |
| </pre>
| |
|
| |
|
| ==== Getting the Portage Tree ==== | | ==== Configuration ==== |
| Funtoo (Unlike Gentoo) uses a git based portage tree, however if you're coming from Gentoo, you'll be glad to know we sync with the Gentoo tree once every 12 hours.
| | Perform the following configuration on Host1: |
| <pre> | | # Create an OVS bridge <pre>ovs-vsctl add-br br0</pre> |
| emerge --sync
| | # Add eth0 to the bridge (by default, all OVS ports are VLAN trunks, so eth0 will pass all VLANs) <pre>ovs-vsctl add-port br0 eth0</pre> |
| </pre> | | # Add VM1 as an "access port" on VLAN1 <pre>ovs-vsctl add-port br0 tap0 tag=1</pre> |
| ''You can ignore most of the errors that might be spat out at this stage, however if they do not disappear on subsequent merges, talk to us in #funtoo.''
| | # Add VM2 on VLAN2 <pre>ovs-vsctl add-port br0 tap0 tag=2</pre> |
| Your first sync will take significantly longer then subsequent syncs, as the whole tree must be synced.
| | On Host2, repeat the same configuration to setup a bridge with eth0 as a trunk <pre>ovs-vsctl add-br br0 |
| | ovs-vsctl add-port br0 eth0</pre> |
| | # Add VM3 to VLAN1 <pre>ovs-vsctl add-port br0 tap0 tag=1</pre> |
| | # Add VM4 to VLAN2 <pre>ovs-vsctl add-port br0 tap0 tag=2</pre> |
|
| |
|
| ==== A Configuration Celebration ==== | | === sFlow === |
| Now that we have our portage tree cloned, we need to do some initial setup on some files before doing anything else with portage.
| | This will setup a VM traffic Monitor using sFlow. |
| | ==== Setup ==== |
| | * Two Physical Networks |
| | ** Data Network: Eternet network for VM data traffic. |
| | ** Management Network: This network must exist, as it is used to send sFlow data from the agent to the remote collector. |
| | * Two Physical Hosts |
| | ** Host1 runs Open vSwitch and has two NICs: |
| | *** eth0 is connected to the Data Network. No IP address can be assigned on eth0. |
| | *** eth1 is connected to the Management Network. eth1 has an IP address for management traffic (including sFlow). |
| | ** Monitoring Host can be any computer that run the sFlow collector. Here we use [http://www.inmon.com/products/sFlowTrend.php sFlowTrend], a free sFlow collector, a simple cross-platform Java tool. Other sFlow collectors should work equally well. |
| | *** eth0 is connected to the Management Netowrk: eth0 has an IP address that can reach Host1. |
| | * Two VMs |
| | VM1, VM2 run on Host1. Each VM has a single interface that appears as a Linux device (e.g., "tap0") on the physical host. (Note: same for Xen/XenServer as in the VLANs section.) |
| | [[image:sflow-setup.png]] |
|
| |
|
| '''Fstab'''
| | ==== Goal ==== |
| | Monitor traffic sent to/from VM1 and VM2 on the Data network using an sFlow collector. |
|
| |
|
| | ==== Configuration ==== |
| | Define the following configuration values in your shell environment. The default port for sFlowTrend is 6343. You will want to set your own IP address for the collector in the place of 10.0.0.1. Setting the AGENT_IP value to eth1 indicates that the sFlow agent should send traffic from eth1's IP address. The other values indicate settings regarding the frequency and type of packet sampling that sFlow should perform. |
| <pre> | | <pre> |
| nano /etc/fstab
| | # export COLLECTOR_IP=10.0.0.1 |
| | # export COLLECTOR_PORT=6343 |
| | # export AGENT_IP=eth1 |
| | # export HEADER_BYTES=128 |
| | # export SAMPLING_N=64 |
| | # export POLLING_SECS=10 |
| </pre> | | </pre> |
| | | Run the following command to create an sFlow configuration and attach it to bridge br0: |
| You'll want something like this: (Replace the dev values with what you are using)
| |
| <pre> | | <pre> |
| # <fs> <mountpoint> <type> <opts> <dump/pass>
| | ovs-vsctl -- -id=@sflow create sflow agent=${AGENT_IP} target=\”${COLLECTOR_IP}:${COLLECTOR_PORT}\” header=${HEADER_BYTES} sampling=${SAMPLING_N} polling=${POLLING_SECS} — set bridge br0 sflow=@sflow |
| | |
| /dev/sda1 /boot ext2 noauto,noatime 1 2
| |
| /dev/sda3 none swap sw 0 0
| |
| /dev/sda4 / ext4 noatime 0 1
| |
| /dev/cdrom /mnt/cdrom auto noauto,ro 0 0
| |
| </pre> | | </pre> |
| | | That is all. To configure sFlow on additional bridges, just replace "br0" in the above command with a different bridge name. |
| '''Localtime'''
| | To remove sFlow configuration from a bridge (in this case, 'br0'), run: |
| | |
| Lets remove the default localtime, and create a symbolic link to the proper time zone. (You probably will want something other then Vancouver)
| |
| <pre> | | <pre> |
| rm /etc/localtime
| | ovs-vsctl remove bridge br0 sflow $SFLOWUUID |
| ln -s /usr/share/zoneinfo/America/Vancouver /etc/localtime
| |
| </pre> | | </pre> |
| | | To see all current sets of sFlow configuration parameters, run: |
| ''' Hostname '''
| |
| Set your host name:
| |
| <pre> | | <pre> |
| nano /etc/conf.d/hostname
| | ovs-vsctl list sflow |
| </pre> | | </pre> |
|
| |
|
| '''hwclock'''
| | === QoS Rate-limiting === |
| | |
| If you're using a dual boot system, you'll want to change this. Otherwise it's entirely optional.
| |
| <pre>
| |
| nano /etc/conf.d/hwclock
| |
| </pre>
| |
| | |
| If you're on windows you'll want:
| |
| <pre>
| |
| clock="local"
| |
| </pre>
| |
| | |
| '''Make.conf'''
| |
| Important enough that it deserves it's own article. A template make.conf for the T420 will be forthcoming.
| |
| | |
| For now:
| |
| If you have an i5 or i3 you will want
| |
| <pre>
| |
| MAKEOPTS="-j3"
| |
| </pre>
| |
| If you have an i7 you'll probably want
| |
| <pre>
| |
| MAKEOPTS="-j5"
| |
| </pre>
| |
| | |
| ''But I have Hyperthreading! Why only -j3?''
| |
| Hyperthreading and compiling don't play well together. You'll have the same (or better) performance with -j3 as -j5 with a dual core hyper threaded processor.
| |
| | |
| == Stop, Kernel time! ==
| |
| ''For this guide we'll be using some pre-found config options that I will be adding later.''
| |
| | |
| * Networking:
| |
| ** iwlwifi and auxilary
| |
| ** Unknown intel ethernet adapter. Selected several.
| |
| * GPU
| |
| ** Intel available default.
| |
| ** nvidia will be dealt with later
| |
| | |
| Install:
| |
| * wpa_supplicant
| |
| * iwl6000-ucode
| |
| * wireless-tools
| |
| | |
| | |
| == Bootloader Setup ==
| |
| In funtoo the setup of grub is extremely simplified.
| |
| <pre>
| |
| emerge -vqat boot-update
| |
| </pre>
| |
| ''Q: What are those options? A: We'll get to them later, lets get the system booted first, okay? ''
| |
| Boot-update is a tool that will allow for very simple configuration of grub similar to older versions (But nicer still).
| |
| | |
| You will now find a file:
| |
| <pre>
| |
| $ cat /etc/boot.conf
| |
| boot {
| |
| generate grub
| |
| default "Funtoo Linux genkernel"
| |
| timeout 3
| |
| }
| |
| | |
| "Funtoo Linux" {
| |
| kernel bzImage[-v]
| |
| # params += nomodeset
| |
| }
| |
| | |
| "Funtoo Linux genkernel" {
| |
| kernel kernel[-v]
| |
| initrd initramfs[-v]
| |
| params += real_root=auto
| |
| # params += nomodeset
| |
| }
| |
| This can be configured (We'll touch on this later. We need to make sure the kernel is booting and working before we start tweaking) with options for the kernel.
| |
| | |
| ==== Dual-Booters Only ====
| |
| If you want to dual boot with windows you'll need to add an entry here:
| |
| <pre>
| |
| "Windows 7" {
| |
| type win7
| |
| params root=/dev/sda1
| |
| }
| |
| </pre>
| |
| ==== Installing Grub onto the Drive(Everyone) ====
| |
| Next we can install grub onto the drive.
| |
| <pre>
| |
| grub-install --no-floppy /dev/sda
| |
| boot-update
| |
| </pre>
| |
| No errors means we should be good to go!
| |
| | |
| == Tidy up and go. ==
| |
| Just a few more things!
| |
| | |
| Lets set a root password.
| |
| <pre>
| |
| passwd
| |
| </pre>
| |
| | |
| It is advisable to exit the chroot and umount all the relevant install drives. Or at least just exit the chroot, but you can just simply reboot from here.
| |
| <pre>
| |
| exit
| |
| cd /
| |
| umount /mnt/funtoo/boot /mnt/funtoo/dev /mnt/funtoo/proc /mnt/funtoo
| |
| reboot
| |
| </pre>
| |
| | |
| == Configuring the New System ==
| |
| Welcome to funtoo! You should be greeted by a bunch of spammy text that scrolls by reasonably fast and then a couple penguins and openrc. Login to your root user and lets start playing.
| |
| | |
| A note, this part of the guide is meant to be much more of a dialogue between us.
| |
| | |
| ==== Getting up the (wired) network ====
| |
| If you're gifted with a wired network connect, use it! The initial setup is much more convenient and quick.
| |
| | |
| Quickly set up the network with
| |
| <pre>
| |
| /etc/init.d/dhcpcd start
| |
| </pre>
| |
| Now check to see if our wired adapter is listed with ifconfig.
| |
| <pre>
| |
| ifconfig
| |
| # (or)
| |
| ping google.com
| |
| </pre>
| |
| If you see it listed with a description, we're good to go!
| |
| | |
| ==== Making the make.conf ====
| |
| Before we start merging into our tree everything under the sun, lets do some system planning.
| |
| | |
| You can use this as a starting point:
| |
| <pre>
| |
| # These settings were set by the metro build script that automatically built this stage.
| |
| # Please consult /etc/make.conf.example for a more detailed example.
| |
| | |
| ACCEPT_KEYWORDS="~amd64"
| |
| CHOST="x86_64-pc-linux-gnu"
| |
| CFLAGS="-march=corei7 -O2 -pipe"
| |
| CXXFLAGS="-march=corei7 -O2 -pipe"
| |
| SYNC="git://github.com/funtoo/ports-2012.git"
| |
| | |
| # -j3 :: Have make use 3 threads by default.
| |
| MAKEOPTS="-j3"
| |
| # Setup emerge's default options:
| |
| # --ask :: Double check before merging.
| |
| # --verbose :: Show use flags etc.
| |
| # --quiet :: Don't show me make spam.
| |
| # --tree :: Use nice dependancy graphs.
| |
| EMERGE_DEFAULT_OPTS="--ask --verbose --quiet --tree"
| |
| | |
| # Portage Features
| |
| # TODO: Descriptions
| |
| FEATURES="mini-manifest parallel-fetch userfetch parallel-install sandbox fixpackages collision-protect"
| |
| | |
| # We might use binary packages later. Lets set that up just in case.
| |
| PORTAGE_BINHOST=/usr/portage/packages
| |
| | |
| | |
| # CCache
| |
| # This is not going to be done by default.
| |
| # Why? It's only wortwhile if you plan on compiling packages multiple
| |
| # times per version, which the average user will not.
| |
| #CCACHE_SIZE="5G"
| |
| #CCACHE_DIR="/var/cache/ccache"
| |
| | |
| # Licenses
| |
| # By default we're just going to accept everything.
| |
| ACCEPT_LICENSE="*"
| |
| | |
| | |
| # Device Specific Settings
| |
| # INPUT_DEVICES :: A list of input devices you'll be wanting. This is needed for xorg and not much else.
| |
| INPUT_DEVICES="evdev synaptics"
| |
| # VIDEO CARDS :: A list of video cards. Optimus users beware here.
| |
| VIDEO_CARDS="intel i915 i965 nvidia"
| |
| | |
| # Use flags.
| |
| # Application specific flags should be migrated to /etc/portage/package.use (which can be a folder with multiple files!)
| |
| # To look at the user flags for an application use "equery uses FOOPKG"
| |
| USE="
| |
| acpi alsa /
| |
| bash-completition /
| |
| curl /
| |
| dvdr /
| |
| ithreads /
| |
| ncurses networkmanager/
| |
| policykit /
| |
| ssl sse sse2 sse3 sse4 /
| |
| threads /
| |
| udev /
| |
| vim-syntax /
| |
| zsh-completion /
| |
| "
| |
| </pre>
| |
| | |
| ==== Getting an Editor ====
| |
| Well, first things first lets get ourselves an editor. The author prefers vim, but you may like emacs or something else... Feel free to disregard this and explore! If you plan to have multiple users however, this will often be expected by experienced linux users.
| |
| | |
| <pre>
| |
| emerge vim
| |
| </pre>
| |
| Check that your USE flags look reasonable (see above) and feel free to do any fine tweaking in /etc/portage/package.use.
| |
| Consult your output after merge! You may want to follow some of it's advice.
| |
| | |
| You can find multiple good guides on google for vim configurations and setups.
| |
| Funtoo also provides a very nice base configuration in /etc/vim/vimrc.
| |
| | |
| ==== Boot Parameters ====
| |
| The T420 has a number of boot parameters that can be set to conserve power. On a laptop these options are generally reasonable:
| |
| <pre>
| |
| $ cat /etc/boot.conf
| |
| boot {
| |
| generate grub
| |
| default "Funtoo Linux"
| |
| timeout 15
| |
| }
| |
| | |
| "Funtoo Linux" {
| |
| kernel bzImage[-v]
| |
| # Force PCIE Active State Power Management on.
| |
| params += pcie_aspm=force
| |
| # TODO (Range 1..15)
| |
| params += epb=7
| |
| # TODO
| |
| params += hpet=force
| |
| # i915 Enable rc6 sleep state (?)
| |
| params += i915.i915_enable_rc6=1
| |
| # TODO (Framebuffer?)
| |
| params += i915.i915_enable_fbc=1
| |
| # Downclock the lvds screen (60hz -> 50hz)
| |
| params += i915.lvds_downclock=1
| |
| # Quiet some of the excessively verbose kernel boot
| |
| params += quiet
| |
| }
| |
| | |
| "Windows 7" {
| |
| type win7
| |
| params root=/dev/sda1
| |
| }
| |
| | |
| #"Funtoo Linux genkernel" {
| |
| # kernel kernel[-v]
| |
| # initrd initramfs[-v]
| |
| # params += real_root=auto
| |
| #}
| |
| </pre>
| |
| | |
| When you're done, update grub with
| |
| <pre>
| |
| boot-update
| |
| </pre>
| |
| | |
| ==== Power Saving Local Scripts ====
| |
| Next we're going to set up a script that runs at default runlevel for the machine. This will echo several options to various dev files. Most distros would do this via /etc/rc.local or something of the like.
| |
| | |
| With Funtoo (and Gentoo) this is accomplished via
| |
| <pre>
| |
| /etc/local.d
| |
| </pre>
| |
| Consult the README (in directory) for more information.
| |
| | |
| <pre>
| |
| $ cat /etc/local.d/power-saving.start
| |
| # /bin/bash
| |
| #
| |
| echo 1 > /sys/modules/snd_hda_intel/parameters/power_save
| |
| for i in /sys/bus/usb/devices/*/power/autosuspend; do
| |
| echo 1 > $i
| |
| done
| |
| for i in /sys/class/scsi_host/host*/link_power_management_policy; do
| |
| echo min_power > $i
| |
| done
| |
| </pre>
| |
| If you copy this wholesale remember to chmod -x the file!
| |
| | |
| ==== rc.conf ====
| |
| rc.conf lets us change some options to do with open RC.
| |
| | |
| First, lets set rc_sys to it's default, this will suppress a warning message at boot.
| |
| <pre>
| |
| rc_sys=""
| |
| </pre>
| |
| | |
| Next, we can turn on rc_parallel to get a bit of speedup on boot.
| |
| <pre>
| |
| rc_parallel="YES"
| |
| </pre>
| |
| If you get errors or problems with services on boot, try turning this off.
| |
| | |
| == Making it Usable ==
| |
| Next we'll be setting up a normal user and installing the venerable Xorg.
| |
| | |
| ==== Mouse in framebuffer ====
| |
| Right now we should be looking at a framebuffer'd console.
| |
| <pre>
| |
| /etc/init.d/gpm start
| |
| </pre>
| |
| gpm is a daemon that allows us to use our mouse (trackpad/trackpoint) on console. Give it a try! If you want to keep it on across boots, add it to your init.
| |
| <pre>
| |
| rc-update add gpm default
| |
| </pre>
| |
| | |
| ==== Making a New User =====
| |
| Lets use superadduser to make the task ever so much easier (Though, it is already easy)
| |
| <pre>
| |
| emerge superadduser
| |
| superadduser
| |
| </pre>
| |
| | |
| Walk through the prompts and set up your user how you choose.
| |
| | |
| ==== Sudo Make Me a Sandwich ====
| |
| Next lets merge in sudo, and set up our new user to be able to use sudo.
| |
| <pre>
| |
| emerge sudo
| |
| </pre>
| |
| Now edit the config with
| |
| <pre>
| |
| visudo
| |
| </pre>
| |
| You'll probably want to uncomment out one of the two options:
| |
| <pre>
| |
| ## Uncomment to allow members of group wheel to execute any command
| |
| # %wheel ALL=(ALL) ALL
| |
| | |
| ## Same thing without a password
| |
| # %wheel ALL=(ALL) NOPASSWD: ALL
| |
| </pre>
| |
| | |
| Now just add your user to the 'wheel' group.
| |
| <pre>
| |
| gpasswd -a foouser wheel
| |
| exit
| |
| </pre>
| |
| Now re-login as your user, and you should be good to go!
| |
| | |
| ==== Tmux ====
| |
| Before we emerge xorg, lets get tmux working so we can easily scroll through output and look at USE flags etc.
| |
| <pre>
| |
| emerge tmux
| |
| </pre>
| |
| The default config will suffice for now. You may find it beneficial to learn to use tmux ''properly'' sometime, but for now we'll hold hands.
| |
| | |
| <pre>
| |
| tmux
| |
| </pre>
| |
| Now we can scroll through output with CTRL+B [ and the up and down arrows.
| |
| | |
| == Xorg ==
| |
| Xorg is a large topic in and on itself. We'll focus on getting a working xorg and a simple window manager.
| |
| | |
| <pre>
| |
| # (in tmux)
| |
| sudo emerge xorg-server
| |
| </pre>
| |
| Once again use CTRL+B [ to start scrolling (escape to exit) and look through your use flags, adding anything you might want.
| |
| | |
| == A note on Gnome ==
| |
| Want to get rid of that awful lock screen on wake from suspend?
| |
| <pre>gsettings set org.gnome.desktop.lockdown disable-lock-screen 'true'</pre>
| |
| | |
| [[Category:HOWTO]]
| |
| [[Category:HWLaptop]]
| |
| [[Category:Hardware Compatibility]]
| |
Open vSwitch
Open vSwitch is a production quality, multilayer virtual switch licensed under the open source Apache 2.0 license. It is designed to enable massive network automation through programmatic extension, while still supporting standard management interfaces and protocols (e.g. NetFlow, sFlow, SPAN, RSPAN, CLI, LACP, 802.1ag). In addition, it is designed to support distribution across multiple physical servers similar to VMware's vNetwork distributed vswitch or Cisco's Nexus 1000V.
Features
The current stablerelease of Open vSwitch (version 1.4.0) supports the following features:
- Visibility into inter-VM communication via NetFlow, sFlow(R), SPAN, RSPAN, and GRE-tunneled mirrors
- LACP (IEEE 802.1AX-2008)
- Standard 802.1Q VLAN model with trunking
- A subset of 802.1ag CCM link monitoring
- STP (IEEE 802.1D-1998)
- Fine-grained min/max rate QoS
- Support for HFSC qdisc
- Per VM interface traffic policing
- NIC bonding with source-MAC load balancing, active backup, and L4 hashing
- OpenFlow protocol support (including many extensions for virtualization)
- IPv6 support
- Multiple tunneling protocols (Ethernet over GRE, CAPWAP, IPsec, GRE over IPsec)
- Remote configuration protocol with local python bindings
- Compatibility layer for the Linux bridging code
- Kernel and user-space forwarding engine options
- Multi-table forwarding pipeline with flow-caching engine
- Forwarding layer abstraction to ease porting to new software and hardware platforms
Configuring Open vSwitch
Open vSwitch needs to be compiled with the kernel modules (modules USE flag) for kernel versions <3.3, since 3.3.0 it is included in the kernel as a module named "Open vSwitch" and can be found in kernel at Networking Support -> Networking Options -> Open vSwitch. Then just emerge openvswitch with
# emerge -avt openvswitch
Using Open vSwitch
These Configs are taken from the Open vSwitch website at http://openvswitch.org and adjusted to funtoo's needs
VLANs
Setup
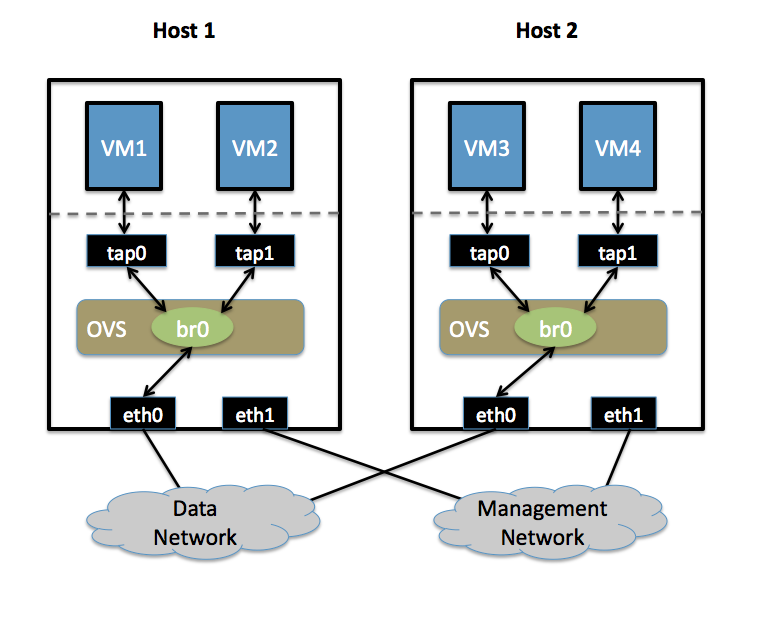
- Two Physical Networks
- Data Network: Eternet network for VM data traffic, which will carry VLAN tagged traffic between VMs. Your physical switch(es) must be capable of forwarding VLAN tagged traffic and the physical switch ports should be VLAN trunks (Usually this is default behavior. Configuring your physical switching hardware is beyond the scope of this document).
- Management Network: This network is not strictly required, but it is a simple way to give the physical host an IP address for remote access, since an IP address cannot be assigned directly to eth0.
- Two Physical Hosts
Host1, Host2. Both hosts are running Open vSwitch. Each host has two NICs:
- eth0 is connected to the Data Network. No IP address can be assigned on eth0
- eth1 is connected to the Management Network (if necessary). eth1 has an IP address that is used to reach the physical host for management.
- Four VMs
VM1, VM2 run on Host1. VM3, VM4 run on Host2.
Each VM has a single interface that appears as a Linux device (e.g., "tap0") on the physical host. (Note: for Xen/XenServer, VM interfaces appear as Linux devices with names like "vif1.0").
Goal
Isolate VMs using VLANs on the Data Network.
VLAN1: VM1, VM3
VLAN2: VM2, VM4
Configuration
Perform the following configuration on Host1:
- Create an OVS bridge
ovs-vsctl add-br br0
- Add eth0 to the bridge (by default, all OVS ports are VLAN trunks, so eth0 will pass all VLANs)
ovs-vsctl add-port br0 eth0
- Add VM1 as an "access port" on VLAN1
ovs-vsctl add-port br0 tap0 tag=1
- Add VM2 on VLAN2
ovs-vsctl add-port br0 tap0 tag=2
On Host2, repeat the same configuration to setup a bridge with eth0 as a trunk
ovs-vsctl add-br br0
ovs-vsctl add-port br0 eth0
- Add VM3 to VLAN1
ovs-vsctl add-port br0 tap0 tag=1
- Add VM4 to VLAN2
ovs-vsctl add-port br0 tap0 tag=2
sFlow
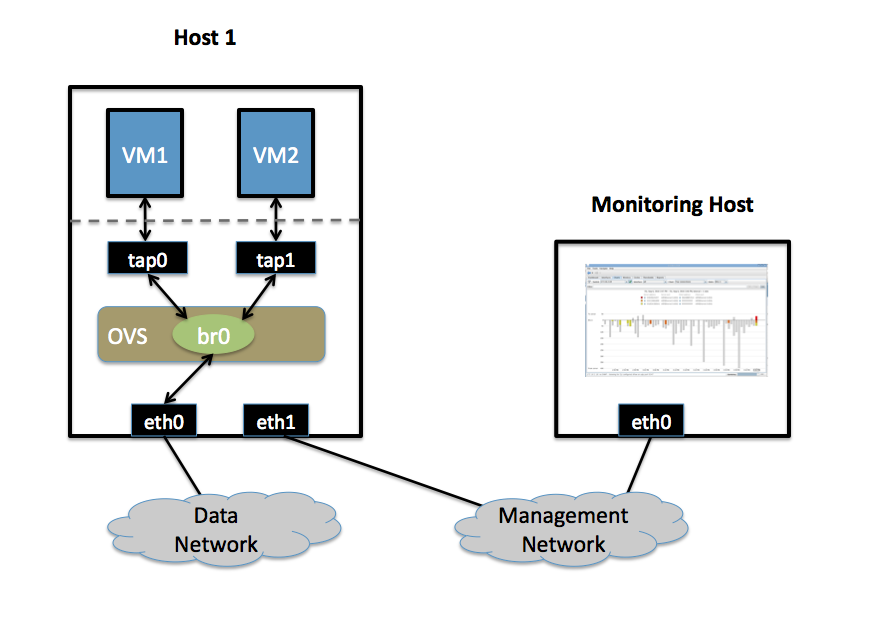
This will setup a VM traffic Monitor using sFlow.
Setup
- Two Physical Networks
- Data Network: Eternet network for VM data traffic.
- Management Network: This network must exist, as it is used to send sFlow data from the agent to the remote collector.
- Two Physical Hosts
- Host1 runs Open vSwitch and has two NICs:
- eth0 is connected to the Data Network. No IP address can be assigned on eth0.
- eth1 is connected to the Management Network. eth1 has an IP address for management traffic (including sFlow).
- Monitoring Host can be any computer that run the sFlow collector. Here we use sFlowTrend, a free sFlow collector, a simple cross-platform Java tool. Other sFlow collectors should work equally well.
- eth0 is connected to the Management Netowrk: eth0 has an IP address that can reach Host1.
- Two VMs
VM1, VM2 run on Host1. Each VM has a single interface that appears as a Linux device (e.g., "tap0") on the physical host. (Note: same for Xen/XenServer as in the VLANs section.)
Goal
Monitor traffic sent to/from VM1 and VM2 on the Data network using an sFlow collector.
Configuration
Define the following configuration values in your shell environment. The default port for sFlowTrend is 6343. You will want to set your own IP address for the collector in the place of 10.0.0.1. Setting the AGENT_IP value to eth1 indicates that the sFlow agent should send traffic from eth1's IP address. The other values indicate settings regarding the frequency and type of packet sampling that sFlow should perform.
# export COLLECTOR_IP=10.0.0.1
# export COLLECTOR_PORT=6343
# export AGENT_IP=eth1
# export HEADER_BYTES=128
# export SAMPLING_N=64
# export POLLING_SECS=10
Run the following command to create an sFlow configuration and attach it to bridge br0:
ovs-vsctl -- -id=@sflow create sflow agent=${AGENT_IP} target=\”${COLLECTOR_IP}:${COLLECTOR_PORT}\” header=${HEADER_BYTES} sampling=${SAMPLING_N} polling=${POLLING_SECS} — set bridge br0 sflow=@sflow
That is all. To configure sFlow on additional bridges, just replace "br0" in the above command with a different bridge name.
To remove sFlow configuration from a bridge (in this case, 'br0'), run:
ovs-vsctl remove bridge br0 sflow $SFLOWUUID
To see all current sets of sFlow configuration parameters, run:
ovs-vsctl list sflow
QoS Rate-limiting

