|
|
| Line 1: |
Line 1: |
| [[Category:OpenStack]]
| | == Open vSwitch == |
|
| |
|
| Keystone is the OpenStack identity service, and is the most foundational Python-based component of OpenStack (that is, ignoring RabbitMQ and any SQL databases you might need). There is a server and client part of Keystone. Typically, Keystone is installed on a server, and the client can be installed anywhere (including the server) and is used to interact with Keystone using the OpenStack Identity API, which uses Web-based protocols as a means of client-server communication. The various components of OpenStack can be configured to connect to Keystone using ''service users'' so that they in turn can authenticate and authorize requests.
| | Open vSwitch is a production quality, multilayer virtual switch licensed under the open source Apache 2.0 license. It is designed to enable massive network automation through programmatic extension, while still supporting standard management interfaces and protocols (e.g. NetFlow, sFlow, SPAN, RSPAN, CLI, LACP, 802.1ag). In addition, it is designed to support distribution across multiple physical servers similar to VMware's vNetwork distributed vswitch or Cisco's Nexus 1000V. |
|
| |
|
| == Definitions == | | === Features === |
|
| |
|
| This section describes the various concepts and definitions that are part of Keystone.
| | The current stablerelease of Open vSwitch (version 1.4.0) supports the following features: |
|
| |
|
| ;Tenants: In Keystone, "tenants" represent logical groups of users to which resources are assigned. Virtual machines ([[Nova]]) and containers ([[Swift]]) are assigned to tenants, not to users directly. Keystone users can be part of more than one tenant, and can have different types of roles defined for each tenant that they're a part of. Think of tenants as a logical way to organize computing and storage resources without assigning them to user accounts directly. Keystone allows you to create and delete tenants, and also enable and disable them.
| | * Visibility into inter-VM communication via NetFlow, sFlow(R), SPAN, RSPAN, and GRE-tunneled mirrors |
| | * LACP (IEEE 802.1AX-2008) |
| | * Standard 802.1Q VLAN model with trunking |
| | * A subset of 802.1ag CCM link monitoring |
| | * STP (IEEE 802.1D-1998) |
| | * Fine-grained min/max rate QoS |
| | * Support for HFSC qdisc |
| | * Per VM interface traffic policing |
| | * NIC bonding with source-MAC load balancing, active backup, and L4 hashing |
| | * OpenFlow protocol support (including many extensions for virtualization) |
| | * IPv6 support |
| | * Multiple tunneling protocols (Ethernet over GRE, CAPWAP, IPsec, GRE over IPsec) |
| | * Remote configuration protocol with local python bindings |
| | * Compatibility layer for the Linux bridging code |
| | * Kernel and user-space forwarding engine options |
| | * Multi-table forwarding pipeline with flow-caching engine |
| | * Forwarding layer abstraction to ease porting to new software and hardware platforms |
|
| |
|
| ;Roles: A role is a common security concept, where a user is assigned a certain set of privileges. This set of privileges is called a role, has a name, and can be managed independently of the specific user account(s) that are part of the role. Keystone allows you to create and delete roles, add a user to a role for a specific tenant, remove a user from a role for a specific tenant, and of course list all the roles that have been defined.
| | == Configuring Open vSwitch == |
|
| |
|
| ;Users: Keystone is used to define users. Users are accounts for specific individuals, and typically have a password and email associated with them. Keystone allows you to list, create, delete, enable/disable, update email addresses, and change passwords of Users.
| | Open vSwitch needs to be compiled with the kernel modules (modules USE flag) for kernel versions <3.3, since 3.3.0 it is included in the kernel as a module named "Open vSwitch" and can be found in kernel at '''Networking Support -> Networking Options -> Open vSwitch'''. Then just emerge openvswitch with |
|
| |
|
| ;Service Users: A service User is a user account created specifically for a component of OpenStack. Service users are typically added to the <tt>services</tt> tenant with the <tt>Admin</tt> role. For example, for [[Nova]], you would create a service User <tt>nova</tt>. Then you would configure Nova to use this Service User to connect to Keystone so that it can authenticate and authorize requests that it receives. See [http://keystone.openstack.org/configuringservices.html OpenStack Documentation on Configuring Services] for more information.
| | <pre> |
| | # emerge -avt openvswitch |
| | </pre> |
|
| |
|
| ;Services: Keystone allows you to define services, which are logical names for parts of OpenStack that provide internal or external capabilities, for things such as identity services, as well as compute and storage services.
| | == Using Open vSwitch == |
|
| |
|
| ;Service Endpoints: These are URLs that define where particular services can be accessed. Various parts of OpenStack will query Keystone for service endpoints that they require. Service endpoints can be created and deleted, and you can "get" a handle (URL) to a service that has been defined. You can also define region-specific service endpoints, so that different regions will be serviced differently.
| | These Configs are taken from the Open vSwitch website at http://openvswitch.org and adjusted to funtoo's needs |
|
| |
|
| ;Service Catalog: Taken as a whole, all the service endpoints defined in Keystone are the ''service catalog'', defining all services available to OpenStack.
| | === VLANs === |
|
| |
|
| == First Steps == | | ==== Setup ==== |
|
| |
|
| In Funtoo Linux, Keystone can be merged by typing:
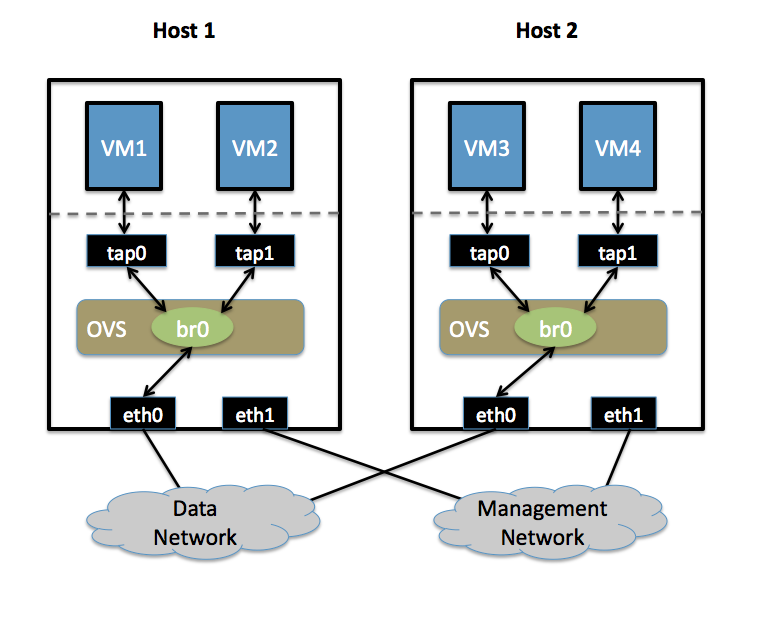
| | * Two Physical Networks |
| | ** Data Network: Eternet network for VM data traffic, which will carry VLAN tagged traffic between VMs. Your physical switch(es) must be capable of forwarding VLAN tagged traffic and the physical switch ports should be VLAN trunks (Usually this is default behavior. Configuring your physical switching hardware is beyond the scope of this document). |
| | ** Management Network: This network is not strictly required, but it is a simple way to give the physical host an IP address for remote access, since an IP address cannot be assigned directly to eth0. |
| | * Two Physical Hosts |
| | Host1, Host2. Both hosts are running Open vSwitch. Each host has two NICs: |
| | ** eth0 is connected to the Data Network. No IP address can be assigned on eth0 |
| | ** eth1 is connected to the Management Network (if necessary). eth1 has an IP address that is used to reach the physical host for management. |
| | * Four VMs |
| | VM1, VM2 run on Host1. VM3, VM4 run on Host2. |
| | Each VM has a single interface that appears as a Linux device (e.g., "tap0") on the physical host. (Note: for Xen/XenServer, VM interfaces appear as Linux devices with names like "vif1.0"). |
| | [[image:2host-4vm.png]] |
|
| |
|
| <console>
| | ==== Goal ==== |
| # ##i##emerge sys-auth/keystone
| |
| </console>
| |
|
| |
|
| Emerging Keystone will also pull in <tt>sys-auth/keystone-client</tt> as a runtime dependency. <tt>keystone-client</tt> (which provides the <tt>keystone</tt> executable) is now maintained in a separate GitHub repository, and connects to Keystone using the OpenStack identity API. Once setting up <tt>/etc/keystone/keystone.conf</tt> and starting the Keystone service, you will use the <tt>keystone</tt> command to define tenants, users, roles, services and service endpoints.
| | Isolate VMs using VLANs on the Data Network. |
| | VLAN1: VM1, VM3 |
| | VLAN2: VM2, VM4 |
|
| |
|
| === Configuration File === | | ==== Configuration ==== |
| | Perform the following configuration on Host1: |
| | # Create an OVS bridge <pre>ovs-vsctl add-br br0</pre> |
| | # Add eth0 to the bridge (by default, all OVS ports are VLAN trunks, so eth0 will pass all VLANs) <pre>ovs-vsctl add-port br0 eth0</pre> |
| | # Add VM1 as an "access port" on VLAN1 <pre>ovs-vsctl add-port br0 tap0 tag=1</pre> |
| | # Add VM2 on VLAN2 <pre>ovs-vsctl add-port br0 tap0 tag=2</pre> |
| | On Host2, repeat the same configuration to setup a bridge with eth0 as a trunk <pre>ovs-vsctl add-br br0 |
| | ovs-vsctl add-port br0 eth0</pre> |
| | # Add VM3 to VLAN1 <pre>ovs-vsctl add-port br0 tap0 tag=1</pre> |
| | # Add VM4 to VLAN2 <pre>ovs-vsctl add-port br0 tap0 tag=2</pre> |
|
| |
|
| The configuration file for the Keystone service is located at <tt>/etc/keystone/keystone.conf</tt>. In this section, we will review important configuration file lines, some of which you will need to modify.
| | === sFlow === |
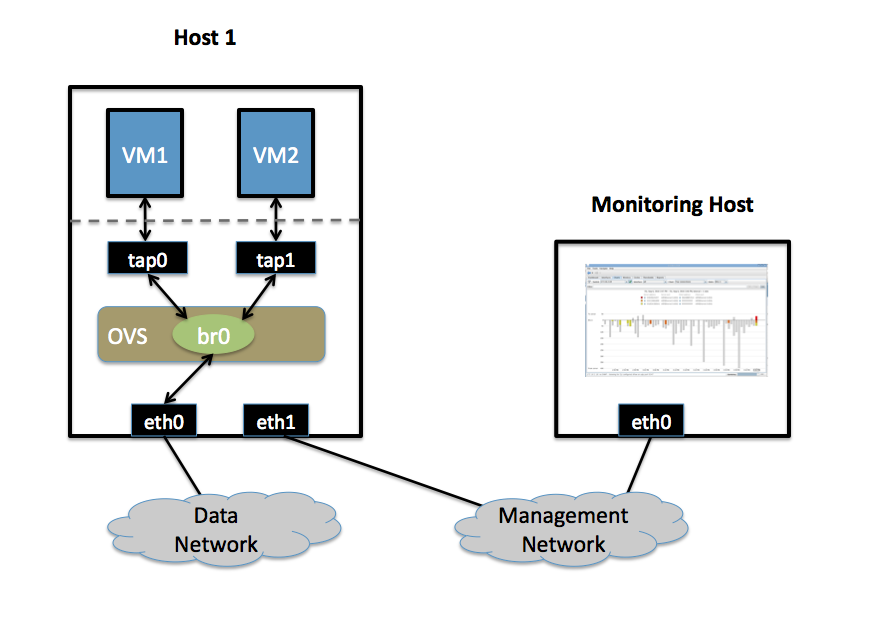
| | This will setup a VM traffic Monitor using sFlow. |
| | ==== Setup ==== |
| | * Two Physical Networks |
| | ** Data Network: Eternet network for VM data traffic. |
| | ** Management Network: This network must exist, as it is used to send sFlow data from the agent to the remote collector. |
| | * Two Physical Hosts |
| | ** Host1 runs Open vSwitch and has two NICs: |
| | *** eth0 is connected to the Data Network. No IP address can be assigned on eth0. |
| | *** eth1 is connected to the Management Network. eth1 has an IP address for management traffic (including sFlow). |
| | ** Monitoring Host can be any computer that run the sFlow collector. Here we use [http://www.inmon.com/products/sFlowTrend.php sFlowTrend], a free sFlow collector, a simple cross-platform Java tool. Other sFlow collectors should work equally well. |
| | *** eth0 is connected to the Management Netowrk: eth0 has an IP address that can reach Host1. |
| | * Two VMs |
| | VM1, VM2 run on Host1. Each VM has a single interface that appears as a Linux device (e.g., "tap0") on the physical host. (Note: same for Xen/XenServer as in the VLANs section.) |
| | [[image:sflow-setup.png]] |
|
| |
|
| ==== DEFAULT Section ==== | | ==== Goal ==== |
| | | Monitor traffic sent to/from VM1 and VM2 on the Data network using an sFlow collector. |
| ;<tt>public_port</tt>: This is the TCP port that non-administrators should access, and defaults to 5000. A number of Keystone commands will be disabled by default on this port, including those related to roles, services and endpoints.
| |
| ;<tt>admin_port</tt>: This is the TCP port that administrators will connect to perform regular (identical to public port) as well as administration tasks. All functionality is enabled on this port, and you can access this port without a user, by using the admin token.
| |
| ;<tt>admin_token</tt>: This setting is a literal string that serves as the master password when connecting to the administration port.
| |
| | |
| === sql Section ===
| |
| | |
| ;<tt>connection</tt>: This is an SQLAlchemy connection string specifying what back-end SQL database to use for the Keystone database. A reasonable initial default is <tt>sqlite:////etc/keystone/keystone.db</tt>.
| |
| | |
| | |
| === Initial Server Configuration ===
| |
| | |
| Here are the steps you can use to get the Keystone service up and running:
| |
| | |
| # Copy <tt>/etc/keystone/keystone.conf.sample</tt> to <tt>/etc/keystone/keystone.conf</tt>.
| |
| # Change the config line <tt>connection =</tt> to read <tt>sqlite:////etc/keystone/keystone.db</tt> (four slashes after the colon)
| |
| # If desired, change the <tt>admin_token</tt> so that it is difficult to guess (especially important for production deployments). The examples below will use the default of '<tt>ADMIN</tt>'.
| |
| # Type <tt>rc-update add keystone default</tt> to add Keystone to the default runlevel, if desired.
| |
| # Type <tt>/etc/init.d/keystone start</tt> to start the Keystone service so that you can perform further configuration.
| |
| | |
| Using SQLite as the database back-end like this is not a great idea for production deployment, but for learning about Keystone it works just fine.
| |
| | |
| Now, initialize the Keystone database:
| |
| | |
| <console>
| |
| # ##i##keystone-manage db_sync
| |
| </console>
| |
| | |
| The command above will initialize all necessary tables so that they are ready to store data.
| |
| | |
| === Initial Authentication ===
| |
| | |
| To perform further configuration of the Keystone service, as well as to query Keystone, we will need to connect to the Keystone service using the keystone client, called <tt>keystone</tt>. Initially, you won't have any users, tenants, roles, or anything else set up, and this creates a chicken-and-egg authentication problem. How do you authenticate with Keystone before you have your own user account?
| |
| | |
| We get around this problem by having the <tt>admin_token = ADMIN</tt> (or other string you specified) setting in <tt>/etc/keystone/keystone.conf</tt> configuration file. This defines a special administration token that is the literal string '<tt>ADMIN</tt>', which can be used like a master password to get full remote control of Keystone so that you can configure it, when you are connecting to the admin port. As long as you know the <tt>admin_token</tt>, you will be able to administrate Keystone from any system that can connect to Keystone's admin port (which defaults to 35357).
| |
| | |
| {{fancyimportant|It is not a good idea to have an <tt>admin_token</tt> defined on a production Keystone installation. Use it for initial setup, and then disable it, and restart Keystone. Then use a user in the 'admin' role for administration via the admin port.}}
| |
| | |
| Let's see how this works in practice. First, we will want to define these environment variables in our shell:
| |
| | |
| <console>
| |
| $ ##i##export SERVICE_ENDPOINT=http://127.0.0.1:35357/v2.0/
| |
| $ ##i##export SERVICE_TOKEN=ADMIN
| |
| </console>
| |
| | |
| Above, we are authenticating against the admin port (35357) using the admin token we defined in <tt>/etc/keystone/keystone.conf</tt>. This grants us full access to the Keystone API so we can perform initial configuration. Let's run a sample command:
| |
| | |
| <console>
| |
| $ ##i##keystone tenant-list
| |
| +----+------+---------+
| |
| | id | name | enabled |
| |
| +----+------+---------+
| |
| +----+------+---------+
| |
| </console>
| |
| | |
| Above, we ran the <tt>keystone tenant-list</tt> command, at which point our client used both environment variables to connect to the Keystone service, query for all tenants, and successfully returned an empty list, because we haven't created any tenants yet.
| |
| If you see this output, then <tt>keystone</tt> used <tt>SERVICE_ENDPOINT</tt> and <tt>SERVICE_TOKEN</tt> environment variables to connect and successfully query Keystone for tenants. This means that Keystone is working properly and ready to be configured further.
| |
| | |
| '''Note:''' To debug authentication issues, type <tt>export KEYSTONECLIENT_DEBUG=1</tt> and retry your attempt.
| |
| | |
| === User-Based Authentication ===
| |
| | |
| BETA user creation steps:
| |
| | |
| <console>
| |
| $ ##i##keystone role-create --name admin
| |
| $ ##i##kestone tenant-create --name admin
| |
| $ ##i##keystone user-create --name admin --pass 'mySekr1t' --email 'drobbins@funtoo.org' --tenant_id admin
| |
| $ ##i##keystone user-role-add --user 0c4a78317f234333a9a1116be1c7b022 --role 805d60f51e03478bbc2cf79ef2d42135 --tenant_id f988b76e5fe546f1a18c08c4d26bcb89
| |
| </console>
| |
| | |
| I need to expand on the above commands, but basically what we are doing is creating a role named <tt>admin</tt>, a tenant named <tt>admin</tt>, a user named <tt>admin</tt> (with a password), and then we are adding the <tt>admin</tt> user to the <tt>admin</tt> role for the <tt>admin</tt> tenant. The last command references the user, role and tenant by ID rather than name. This is one of the tricky aspects of the Keystone API -- sometimes you will need to use numeric IDs rather than logical names for some API commands. You can grab the proper ID by issuing <tt>user-list</tt>, <tt>tenant-list</tt>, or <tt>role-list</tt> <tt>keystone</tt> commands.
| |
| | |
| Once you have a user named <tt>admin</tt> created, here is how you will use <tt>keystone</tt> to connect to the Keystone service. First, we will want to define these environment variables, and it's a good idea to put these in <tt>~/.bashrc</tt> or <tt>~/.bash_profile</tt>:
| |
| | |
| {{fancynote|<tt>SERVICE_ENDPOINT</tt> and <tt>SERVICE_TOKEN</tt> must be unset in order to force the client to use user-based authentication. Otherwise it will assume that you are attempting to perform token-based authentication.}}
| |
| | |
| <console>
| |
| $ ##i##unset SERVICE_ENDPOINT
| |
| $ ##i##unset SERVICE_TOKEN
| |
| $ ##i##export OS_AUTH_URL=http://127.0.0.1:35357/v2.0/
| |
| </console>
| |
| | |
| {{fancynote|If you specify port 5000 instead of 35357 in the OS_AUTH_URL above, you will be connecting to the public port, and some administration functions will be unavailable. Using port 35357 will allow you to access the full functionality of the API.}}
| |
| | |
| Note that we no longer need to define <tt>SERVICE_TOKEN</tt>, because we're not using it anymore. Now, here's how we run a Keystone-related query:
| |
| | |
| <console>
| |
| $ ##i##keystone --os_username='admin' --os_password 'mySekr1t' user-list
| |
| +----------------------------------+---------+---------------------+-------+
| |
| | id | enabled | email | name |
| |
| +----------------------------------+---------+---------------------+-------+
| |
| | 0c4a78317f234333a9a1116be1c7b022 | True | drobbins@funtoo.org | admin |
| |
| +----------------------------------+---------+---------------------+-------+
| |
| </console>
| |
| | |
| If you get tired of specifying the two extra command-line arguments above, you can export the environment variables <tt>OS_USERNAME</tt> and <tt>OS_PASSWORD</tt> and Keystone will use them if defined. Note that it is not a good idea to store your plain-text password in any file.
| |
| | |
| Also note that when calling <tt>keystone</tt>, specify <tt>--os_username</tt> and <tt>--os_password</tt> first, before the command you are calling, such as <tt>service-create</tt>. Then, after <tt>service-create</tt>, you would specify any options related to service creation, such as <tt>--region</tt>.
| |
| | |
| == Service Catalog ==
| |
| | |
| The service catalog is an important concept for Keystone and OpenStack, because this is where you knit all of the various parts of your OpenStack deployment into a coherent whole that works together. So we are going to explore service catalog configuration in detail. There are two ways to set up a service catalog. One is to use a plain-text configuration file, and the other is to store your service catalog in a SQL back-end by using <tt>keystone service-create</tt> commands. The latter is recommended, but we will cover both approaches:
| |
| | |
| === Plain-Text Catalog ===
| |
| | |
| In older versions of OpenStack, the service catalog was defined using a plain-text catalog file. This method is still supported by OpenStack, but I think it's a bit confusing and using the SQL method documented in the next section is recommended. However, I am including documentation on the plain-text catalog because it shows up in a lot of OpenStack documentation so it's helpful to be familiar with how it works.
| |
| | |
| To enable the plain-text catalog, you would add the following settings to <tt>/etc/keystone/keystone.conf</tt>:
| |
|
| |
|
| | ==== Configuration ==== |
| | Define the following configuration values in your shell environment. The default port for sFlowTrend is 6343. You will want to set your own IP address for the collector in the place of 10.0.0.1. Setting the AGENT_IP value to eth1 indicates that the sFlow agent should send traffic from eth1's IP address. The other values indicate settings regarding the frequency and type of packet sampling that sFlow should perform. |
| | <pre> |
| | # export COLLECTOR_IP=10.0.0.1 |
| | # export COLLECTOR_PORT=6343 |
| | # export AGENT_IP=eth1 |
| | # export HEADER_BYTES=128 |
| | # export SAMPLING_N=64 |
| | # export POLLING_SECS=10 |
| | </pre> |
| | Run the following command to create an sFlow configuration and attach it to bridge br0: |
| | <pre> |
| | ovs-vsctl -- -id=@sflow create sflow agent=${AGENT_IP} target=\”${COLLECTOR_IP}:${COLLECTOR_PORT}\” header=${HEADER_BYTES} sampling=${SAMPLING_N} polling=${POLLING_SECS} — set bridge br0 sflow=@sflow |
| | </pre> |
| | That is all. To configure sFlow on additional bridges, just replace "br0" in the above command with a different bridge name. |
| | To remove sFlow configuration from a bridge (in this case, 'br0'), run: |
| | <pre> |
| | ovs-vsctl remove bridge br0 sflow $SFLOWUUID |
| | </pre> |
| | To see all current sets of sFlow configuration parameters, run: |
| <pre> | | <pre> |
| [catalog]
| | ovs-vsctl list sflow |
| driver = keystone.catalog.backends.templated.TemplatedCatalog
| |
| template_file = /etc/keystone/service_catalog
| |
| </pre> | | </pre> |
|
| |
|
| You would then define a plain-text catalog at <tt>/etc/keystone/service_catalog</tt>. An example service catalog is installed at <tt>/usr/share/doc/keystone-9999/etc/default_catalog.templates.bz2</tt>
| | === QoS Rate-limiting === |
| | |
| Once this is enabled in your configuration, and keystone is restarted, then the service catalog will be defined in Keystone. At this point, it will not be possible to define any services using the SQL method, via <tt>keystone service-create</tt>.
| |
| | |
| === SQL-based Catalog === | |
| | |
| The SQL-based service catalog does not require any additional configuration besides ensuring that a SQL backend is configured for Keystone, which is a typical part of the install process.
| |
| | |
| To create a service endpoint, you would first define the service, using a command like this:
| |
| | |
| <console>
| |
| $ ##i##keystone service-create --name=nova --type=compute --description="Nova Compute Service"
| |
| +-------------+----------------------------------+
| |
| | Property | Value |
| |
| +-------------+----------------------------------+
| |
| | description | Nova Compute Service |
| |
| | id | c3600f9e26be495f9b0ed1328c33a436 |
| |
| | name | nova |
| |
| | type | compute |
| |
| +-------------+----------------------------------+
| |
| </console>
| |
| | |
| Now that the service is defined, we can define an endpoint for this service, for region <tt>RegionOne</tt>:
| |
| | |
| <console>
| |
| $ ##i##keystone endpoint-create --region RegionOne --service_id c3600f9e26be495f9b0ed1328c33a436 \
| |
| ##i##--publicurl 'http://127.0.0.1:$(compute_port)s/v1.1/$(tenant_id)s' \
| |
| ##i##--adminurl 'http://127.0.0.1:$(compute_port)s/v1.1/$(tenant_id)s' \
| |
| ##i##--internalurl 'http://127.0.0.1:$(compute_port)s/v1.1/$(tenant_id)s'
| |
| </console>
| |
| | |
| == Resources ==
| |
| | |
| OpenStack Identity Service:
| |
| | |
| * http://docs.openstack.org/api/openstack-identity-service/2.0/content/
| |
| * https://github.com/openstack/identity-api
| |
Open vSwitch
Open vSwitch is a production quality, multilayer virtual switch licensed under the open source Apache 2.0 license. It is designed to enable massive network automation through programmatic extension, while still supporting standard management interfaces and protocols (e.g. NetFlow, sFlow, SPAN, RSPAN, CLI, LACP, 802.1ag). In addition, it is designed to support distribution across multiple physical servers similar to VMware's vNetwork distributed vswitch or Cisco's Nexus 1000V.
Features
The current stablerelease of Open vSwitch (version 1.4.0) supports the following features:
- Visibility into inter-VM communication via NetFlow, sFlow(R), SPAN, RSPAN, and GRE-tunneled mirrors
- LACP (IEEE 802.1AX-2008)
- Standard 802.1Q VLAN model with trunking
- A subset of 802.1ag CCM link monitoring
- STP (IEEE 802.1D-1998)
- Fine-grained min/max rate QoS
- Support for HFSC qdisc
- Per VM interface traffic policing
- NIC bonding with source-MAC load balancing, active backup, and L4 hashing
- OpenFlow protocol support (including many extensions for virtualization)
- IPv6 support
- Multiple tunneling protocols (Ethernet over GRE, CAPWAP, IPsec, GRE over IPsec)
- Remote configuration protocol with local python bindings
- Compatibility layer for the Linux bridging code
- Kernel and user-space forwarding engine options
- Multi-table forwarding pipeline with flow-caching engine
- Forwarding layer abstraction to ease porting to new software and hardware platforms
Configuring Open vSwitch
Open vSwitch needs to be compiled with the kernel modules (modules USE flag) for kernel versions <3.3, since 3.3.0 it is included in the kernel as a module named "Open vSwitch" and can be found in kernel at Networking Support -> Networking Options -> Open vSwitch. Then just emerge openvswitch with
# emerge -avt openvswitch
Using Open vSwitch
These Configs are taken from the Open vSwitch website at http://openvswitch.org and adjusted to funtoo's needs
VLANs
Setup
- Two Physical Networks
- Data Network: Eternet network for VM data traffic, which will carry VLAN tagged traffic between VMs. Your physical switch(es) must be capable of forwarding VLAN tagged traffic and the physical switch ports should be VLAN trunks (Usually this is default behavior. Configuring your physical switching hardware is beyond the scope of this document).
- Management Network: This network is not strictly required, but it is a simple way to give the physical host an IP address for remote access, since an IP address cannot be assigned directly to eth0.
- Two Physical Hosts
Host1, Host2. Both hosts are running Open vSwitch. Each host has two NICs:
- eth0 is connected to the Data Network. No IP address can be assigned on eth0
- eth1 is connected to the Management Network (if necessary). eth1 has an IP address that is used to reach the physical host for management.
- Four VMs
VM1, VM2 run on Host1. VM3, VM4 run on Host2.
Each VM has a single interface that appears as a Linux device (e.g., "tap0") on the physical host. (Note: for Xen/XenServer, VM interfaces appear as Linux devices with names like "vif1.0").
Goal
Isolate VMs using VLANs on the Data Network.
VLAN1: VM1, VM3
VLAN2: VM2, VM4
Configuration
Perform the following configuration on Host1:
- Create an OVS bridge
ovs-vsctl add-br br0
- Add eth0 to the bridge (by default, all OVS ports are VLAN trunks, so eth0 will pass all VLANs)
ovs-vsctl add-port br0 eth0
- Add VM1 as an "access port" on VLAN1
ovs-vsctl add-port br0 tap0 tag=1
- Add VM2 on VLAN2
ovs-vsctl add-port br0 tap0 tag=2
On Host2, repeat the same configuration to setup a bridge with eth0 as a trunk
ovs-vsctl add-br br0
ovs-vsctl add-port br0 eth0
- Add VM3 to VLAN1
ovs-vsctl add-port br0 tap0 tag=1
- Add VM4 to VLAN2
ovs-vsctl add-port br0 tap0 tag=2
sFlow
This will setup a VM traffic Monitor using sFlow.
Setup
- Two Physical Networks
- Data Network: Eternet network for VM data traffic.
- Management Network: This network must exist, as it is used to send sFlow data from the agent to the remote collector.
- Two Physical Hosts
- Host1 runs Open vSwitch and has two NICs:
- eth0 is connected to the Data Network. No IP address can be assigned on eth0.
- eth1 is connected to the Management Network. eth1 has an IP address for management traffic (including sFlow).
- Monitoring Host can be any computer that run the sFlow collector. Here we use sFlowTrend, a free sFlow collector, a simple cross-platform Java tool. Other sFlow collectors should work equally well.
- eth0 is connected to the Management Netowrk: eth0 has an IP address that can reach Host1.
- Two VMs
VM1, VM2 run on Host1. Each VM has a single interface that appears as a Linux device (e.g., "tap0") on the physical host. (Note: same for Xen/XenServer as in the VLANs section.)
Goal
Monitor traffic sent to/from VM1 and VM2 on the Data network using an sFlow collector.
Configuration
Define the following configuration values in your shell environment. The default port for sFlowTrend is 6343. You will want to set your own IP address for the collector in the place of 10.0.0.1. Setting the AGENT_IP value to eth1 indicates that the sFlow agent should send traffic from eth1's IP address. The other values indicate settings regarding the frequency and type of packet sampling that sFlow should perform.
# export COLLECTOR_IP=10.0.0.1
# export COLLECTOR_PORT=6343
# export AGENT_IP=eth1
# export HEADER_BYTES=128
# export SAMPLING_N=64
# export POLLING_SECS=10
Run the following command to create an sFlow configuration and attach it to bridge br0:
ovs-vsctl -- -id=@sflow create sflow agent=${AGENT_IP} target=\”${COLLECTOR_IP}:${COLLECTOR_PORT}\” header=${HEADER_BYTES} sampling=${SAMPLING_N} polling=${POLLING_SECS} — set bridge br0 sflow=@sflow
That is all. To configure sFlow on additional bridges, just replace "br0" in the above command with a different bridge name.
To remove sFlow configuration from a bridge (in this case, 'br0'), run:
ovs-vsctl remove bridge br0 sflow $SFLOWUUID
To see all current sets of sFlow configuration parameters, run:
ovs-vsctl list sflow
QoS Rate-limiting

