Difference between revisions of "Creating Your Own Overlay"
(hopefully more clarity on the name myoverlay) |
|||
| (56 intermediate revisions by 16 users not shown) | |||
| Line 1: | Line 1: | ||
More involved developers may want to consider contributing to Funtoo Linux by maintaining an independent ''overlay''. | |||
Traditionally, an overlay is a Portage repository that can be added dynamically to a user's system to augment the available ebuilds and [[Catpkg|catpkgs]]. However, with Funtoo it is also possible for our automated scripts to merge your overlay, or parts of it, into Funtoo Linux itself. If you are maintaining quite a few ebuilds, this lets us "pull" from your independently-maintained overlay so that you don't need to submit lots of pull requests via https://code.funtoo.org. So it can be a very serious time savings for developers who are more advanced. | |||
==Creating Your Overlay == | |||
There are two ways to create an overlay that we'll cover. The first is to simply create a local overlay as follows (courtesy seemant, thanks!) | |||
### | ===Creating a Local Overlay=== | ||
# | roughly speaking: | ||
# create an overlay directory (.e.g /home/USER/overlay or wherever) | |||
# add two dirs: profiles and metadata | |||
# in the profiles dir, put a file called repo_name and put a name in there like "MYOVERLAY" | |||
# in the metadata dir you need a file called layout.conf (see below) | |||
# create a file in /etc/portage/repos.conf called local-overlay and populate with data (see below) | |||
{{console|body= | |||
$##i## mkdir $HOME/overlay | |||
$##i## mkdir $HOME/overlay/profiles | |||
$##i## mkdir $HOME/overlay/metadata | |||
$##i## echo "myoverlay" > $HOME/overlay/profiles/repo_name | |||
}} | |||
{{file|name=/ | {{file|name=/home/USER/overlay/metadata/layout.conf|lang=|desc=|body= | ||
thin-manifests = true | |||
}} | sign-manifests = false | ||
profile-formats = portage-2 | |||
cache-formats = md5-dict | |||
masters = core-kit | |||
manifest-hashes = SHA512 | |||
}} | |||
{{file|name=/etc/portage/repos.conf/local-overlay|lang=|desc=|body= | |||
[myoverlay] | |||
location = /home/USER/overlay | |||
auto-sync = no | |||
priority = 10 | |||
}} | |||
The ''myoverlay'' in the above needs replacing if you chose a different overlay name. | |||
{{console|body=###i## mkdir - | then to manipulate an ebuild to a new revision for example glibc | ||
###i## | {{console|body= | ||
$##i## cd $HOME/overlay | |||
###i## | $##i## mkdir sys-libs && cd sys-libs | ||
$##i## mkdir glibc && cd glibc | |||
$##i## cp /var/db/pkg/sys-libs/glibc-2.33-r2/glibc-2.33-r2.ebuild . | |||
$##i## mv glibc-2.33-r2.ebuild glibc-2.33-r3.ebuild | |||
###i## emerge -av glibc | |||
}} | |||
===Creating an online overlay=== | |||
The second is quite simple and can be done via https://code.funtoo.org. Simply go to https://code.funtoo.org/bitbucket/projects/CO/repos/skeleton-overlay/browse and click the "Create fork" button: | |||
[[File:create fork.png|480px|center]] | |||
At this point, you will be presented with the next screen, where you should type in a new name for your overlay, ''disable fork syncing'', and click "Fork Repository". | |||
[[File:fork_overlay2.png|480px|center]] | |||
=== Making it Public === | |||
You have now created your own initial overlay, but it is not visible to the public. To make it visible to the public, go to {{c|Repository Settings}}, then {{c|Repository Permissions}} and finally check {{c|Public Access -- Allow public access to this repository}}. Your repository can now be seen (but not modified) by others. | |||
== | === Learning More About code.funtoo.org === | ||
To learn more about code.funtoo.org, please see the following video. We will still need to perform some finishing steps to get the overlay ready for use, which we will cover below. | |||
=== | {{#evt:service=youtube|id=https://youtu.be/V6PfB64oMWo|dimensions=480|alignment=center|autoresize=true}} | ||
=== Cloning and Finishing Touches === | |||
{{note|you may change every "my-overlay" to your personal repositories name}} | |||
You will now want to add a ssh key to code.funtoo.org (see video above for more information.) Then, clone it locally, and perform the following steps to properly set the overlay name: | |||
{{console|body= | |||
$ ##i##git clone ssh://git@code.funtoo.org:7999/~drobbins/my-overlay.git | |||
Cloning into 'my-overlay'... | |||
remote: Enumerating objects: 16, done. | |||
remote: Counting objects: 100% (16/16), done. | |||
remote: Compressing objects: 100% (12/12), done. | |||
remote: Total 16 (delta 4), reused 0 (delta 0) | |||
Receiving objects: 100% (16/16), 8.64 KiB {{!}} 8.64 MiB/s, done. | |||
Resolving deltas: 100% (4/4), done. | |||
$ ##i##cd my-overlay | |||
$ ##i##echo "my-overlay" > profiles/repo_name | |||
$ ##i##sed -i 's/skeleton/my-overlay/' metadata/layout.conf | |||
$ ##i##git add . | |||
$ ##i##git commit -a -m "Setting initial repo name." | |||
$ ##i##git push | |||
}} | |||
{{ | {{Tip|Now is also a good time to review the {{c|README.rst}} and {{c|LICENSE.txt}} and customize as needed.}} | ||
Now, your overlay is ready for new ebuilds to be committed to it. But before we do that, we should configure Portage to "see" your overlay and any packages it contains. | |||
=== Create repos.conf Entry === | |||
Create the following file in order to register your overlay with Portage: | |||
{{file|name=/etc/portage/repos.conf/my-overlay.conf|lang=|desc=Add your overlay to portage|body= | |||
[my-overlay] | |||
location = /home/myuser/my-overlay | |||
auto-sync = no | |||
priority = 10 | |||
}} | |||
{{tip|The {{c|priority}} key is needed to ensure that your overlay has higher priority to the kit's overlays, which are default priority 1.}} | |||
Now, you are ready to add new ebuilds that are not present in portage tree or fix the ebuilds from portage tree you are not satisfied with, updating old packages or removing newer package versions. | |||
For example, to create an updated version of the package {{c|net-misc/autossh}} not currently in the repository, create the directory tree {{f|net-misc/autossh}} under {{c|my-overlay}}. In the {{f|autossh}} directory you created, you can add new {{c|autossh-x.y.z.ebuild}} files. | |||
==back to [[Development_Guide]]== | |||
[[Category:Portage]] | |||
[[Category:Official Documentation]] | |||
Latest revision as of 17:59, December 22, 2023
More involved developers may want to consider contributing to Funtoo Linux by maintaining an independent overlay.
Traditionally, an overlay is a Portage repository that can be added dynamically to a user's system to augment the available ebuilds and catpkgs. However, with Funtoo it is also possible for our automated scripts to merge your overlay, or parts of it, into Funtoo Linux itself. If you are maintaining quite a few ebuilds, this lets us "pull" from your independently-maintained overlay so that you don't need to submit lots of pull requests via https://code.funtoo.org. So it can be a very serious time savings for developers who are more advanced.
Creating Your Overlay
There are two ways to create an overlay that we'll cover. The first is to simply create a local overlay as follows (courtesy seemant, thanks!)
Creating a Local Overlay
roughly speaking:
- create an overlay directory (.e.g /home/USER/overlay or wherever)
- add two dirs: profiles and metadata
- in the profiles dir, put a file called repo_name and put a name in there like "MYOVERLAY"
- in the metadata dir you need a file called layout.conf (see below)
- create a file in /etc/portage/repos.conf called local-overlay and populate with data (see below)
user $ mkdir $HOME/overlay
user $ mkdir $HOME/overlay/profiles
user $ mkdir $HOME/overlay/metadata
user $ echo "myoverlay" > $HOME/overlay/profiles/repo_name
/home/USER/overlay/metadata/layout.conf thin-manifests = true sign-manifests = false profile-formats = portage-2 cache-formats = md5-dict masters = core-kit manifest-hashes = SHA512
/etc/portage/repos.conf/local-overlay [myoverlay] location = /home/USER/overlay auto-sync = no priority = 10
The myoverlay in the above needs replacing if you chose a different overlay name.
then to manipulate an ebuild to a new revision for example glibc
user $ cd $HOME/overlay
user $ mkdir sys-libs && cd sys-libs
user $ mkdir glibc && cd glibc
user $ cp /var/db/pkg/sys-libs/glibc-2.33-r2/glibc-2.33-r2.ebuild .
user $ mv glibc-2.33-r2.ebuild glibc-2.33-r3.ebuild
root # emerge -av glibc
Creating an online overlay
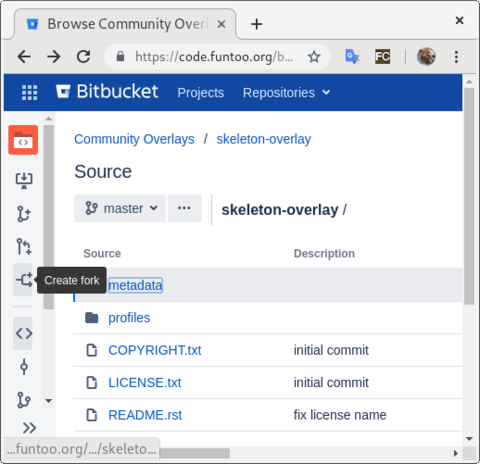
The second is quite simple and can be done via https://code.funtoo.org. Simply go to https://code.funtoo.org/bitbucket/projects/CO/repos/skeleton-overlay/browse and click the "Create fork" button:
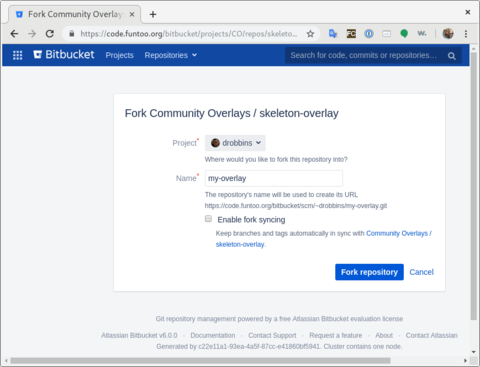
At this point, you will be presented with the next screen, where you should type in a new name for your overlay, disable fork syncing, and click "Fork Repository".
Making it Public
You have now created your own initial overlay, but it is not visible to the public. To make it visible to the public, go to Repository Settings, then Repository Permissions and finally check Public Access -- Allow public access to this repository. Your repository can now be seen (but not modified) by others.
Learning More About code.funtoo.org
To learn more about code.funtoo.org, please see the following video. We will still need to perform some finishing steps to get the overlay ready for use, which we will cover below.
Cloning and Finishing Touches
you may change every "my-overlay" to your personal repositories name
You will now want to add a ssh key to code.funtoo.org (see video above for more information.) Then, clone it locally, and perform the following steps to properly set the overlay name:
user $ git clone ssh://git@code.funtoo.org:7999/~drobbins/my-overlay.git
Cloning into 'my-overlay'...
remote: Enumerating objects: 16, done.
remote: Counting objects: 100% (16/16), done.
remote: Compressing objects: 100% (12/12), done.
remote: Total 16 (delta 4), reused 0 (delta 0)
Receiving objects: 100% (16/16), 8.64 KiB | 8.64 MiB/s, done.
Resolving deltas: 100% (4/4), done.
user $ cd my-overlay
user $ echo "my-overlay" > profiles/repo_name
user $ sed -i 's/skeleton/my-overlay/' metadata/layout.conf
user $ git add .
user $ git commit -a -m "Setting initial repo name."
user $ git push
Now is also a good time to review the README.rst and LICENSE.txt and customize as needed.
Now, your overlay is ready for new ebuilds to be committed to it. But before we do that, we should configure Portage to "see" your overlay and any packages it contains.
Create repos.conf Entry
Create the following file in order to register your overlay with Portage:
/etc/portage/repos.conf/my-overlay.conf - Add your overlay to portage[my-overlay] location = /home/myuser/my-overlay auto-sync = no priority = 10
The priority key is needed to ensure that your overlay has higher priority to the kit's overlays, which are default priority 1.
Now, you are ready to add new ebuilds that are not present in portage tree or fix the ebuilds from portage tree you are not satisfied with, updating old packages or removing newer package versions.
For example, to create an updated version of the package net-misc/autossh not currently in the repository, create the directory tree net-misc/autossh under my-overlay. In the autossh directory you created, you can add new autossh-x.y.z.ebuild files.

