Difference between revisions of "Funtoo:User Services/IPv6 Tunnel"
| Line 8: | Line 8: | ||
process is free. You may be required to complete some IPv6 training first. Once you have done this, you should | process is free. You may be required to complete some IPv6 training first. Once you have done this, you should | ||
be able to configure a tunnel, which will have settings similar to this one: | be able to configure a tunnel, which will have settings similar to this one: | ||
[[File:Tunnelbroker.png|thumb|tunnelbroker.net example tunnel]] | |||
To make sense of the critical settings of this tunnel, let's talk a bit about how this IPv6 tunnel works. For those who are impatient, here is the actual file we will use to bring up the tunnel -- but please note that ''additional configuration is required'' to get the tunnel working properly! | |||
{{file|lang=bash|name=/etc/netif.d/ipv6-tunnel-router|body= | |||
#!/bin/sh | |||
netif_pre_up() { | |||
try ip tunnel add $interface mode sit remote $endpoint_remote local $endpoint_local ttl 255 | |||
try ip link set $interface up | |||
try ip addr add $tunnel_local_ipv6 dev $interface | |||
} | |||
netif_post_up() { | |||
# all IPv6 traffic should go out the tunnel: | |||
try ip route add ::/0 dev $interface | |||
# ...except traffic to our assigned IPv6 block, which all sits on $route_interface: | |||
try ip route add $route_assigned_block dev $route_interface | |||
} | |||
netif_pre_down() { | |||
ip route del $route_assigned_block dev $route_interface | |||
ip route del ::/0 dev $interface | |||
} | |||
netif_post_down() { | |||
ip tunnel del $interface | |||
} | |||
}} | |||
Since we don't have IPv6, and are relying on IPv4 to create our tunnel, we need to | |||
link both ends of the tunnel. The tunnelbroker.net end is the "Server IPv4 Address" ({{c|$endpoint_remote}}, above), and our end is the "Client IPv4 Address" {{c|$endpoint_local}}, above. | |||
Once the tunnel is set up, we have to deal with IPv6, so let's talk about that. Tunnelbroker.net gives us a "slash 64" (/64), which is a block of 2^64 IPv6 addresses. All these addresses are expected to exist on "our side" of the tunnel. | |||
In addition, there is a ''second'' IPv6 network, which is used exclusively by the tunnel itself. This is a frequent source of confusion. | |||
Revision as of 18:06, December 23, 2022
Some Funtoo Linux datacenters do not have native IPv6 support, so we rely on IPv6 tunnel services provided by he.net.
This page will document how to reliably set up an IPv6 tunnel under Funtoo Linux. This particular configuration is focused on setting up a tunnel router, which means that it's not just about providing IPv6 to a single server. Instead, the server we will configure will provide IPv6 for an entire bridged network.
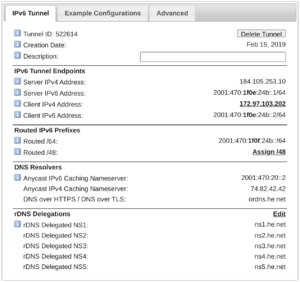
To follow these exact steps, you will need to visit https://tunnelbroker.net and register for an account. This process is free. You may be required to complete some IPv6 training first. Once you have done this, you should be able to configure a tunnel, which will have settings similar to this one:
To make sense of the critical settings of this tunnel, let's talk a bit about how this IPv6 tunnel works. For those who are impatient, here is the actual file we will use to bring up the tunnel -- but please note that additional configuration is required to get the tunnel working properly!
/etc/netif.d/ipv6-tunnel-router (bash source code) #!/bin/sh
netif_pre_up() {
try ip tunnel add $interface mode sit remote $endpoint_remote local $endpoint_local ttl 255
try ip link set $interface up
try ip addr add $tunnel_local_ipv6 dev $interface
}
netif_post_up() {
# all IPv6 traffic should go out the tunnel:
try ip route add ::/0 dev $interface
# ...except traffic to our assigned IPv6 block, which all sits on $route_interface:
try ip route add $route_assigned_block dev $route_interface
}
netif_pre_down() {
ip route del $route_assigned_block dev $route_interface
ip route del ::/0 dev $interface
}
netif_post_down() {
ip tunnel del $interface
}
Since we don't have IPv6, and are relying on IPv4 to create our tunnel, we need to
link both ends of the tunnel. The tunnelbroker.net end is the "Server IPv4 Address" ($endpoint_remote, above), and our end is the "Client IPv4 Address" $endpoint_local, above.
Once the tunnel is set up, we have to deal with IPv6, so let's talk about that. Tunnelbroker.net gives us a "slash 64" (/64), which is a block of 2^64 IPv6 addresses. All these addresses are expected to exist on "our side" of the tunnel.
In addition, there is a second IPv6 network, which is used exclusively by the tunnel itself. This is a frequent source of confusion.
