Dell PowerEdge 11G Servers
Funtoo Linux on Dell PowerEdge 11G Servers
This section provides valuable information regarding the use of Funtoo Linux on Dell PowerEdge 11G servers. This information has been validated on Dell PowerEdge R710 systems with Intel Xeon 5500 processors but should also apply to varying degrees to the entire Dell PowerEdge 11G family.
Please be sure to read all important compatibility notes associated with your specific Dell PowerEdge model, which can be found in the Important Compatibility Notes column in the table below:
| System | Form Factor | Processor | Integrated NIC | Important Compatibility Notes |
|---|---|---|---|---|
| R210 | 1U | Intel Xeon 3400 series | BCM 5716 | [hw 1] |
| R310 | 1U | Intel Xeon 3400 series | 2x1GbE (BCM 5716) | [hw 1] |
| R410 | 1U | Intel Xeon 5500 series | 2x1GbE (BCM 5716) | [hw 1][hw 2] |
| R415 | 1U | AMD Opteron 4100 series | 2x1GbE (BCM 5716) | [hw 1] |
| R510 | 2U | Intel Xeon 5500 series | 2x1GbE (BCM 5716) | [hw 1][hw 2] |
| R515 | 2U | AMD Opteron 4100 series | 2x1GbE (BCM 5716) | [hw 1] |
| R710 | 2U | Intel Xeon 5500/5600 series | 4x1GbE (BCM 5709c) | [hw 1][hw 2] |
| R715 | 2U | AMD Opteron 6100 series | 4x1GbE (BCM 5709c) | [hw 1] |
| R810 | 2U | Intel Xeon 6500/7500 series | 4x1GbE (BCM 5709c) | [hw 1] |
| R815 | 2U | AMD Opteron 6100 series | 4x1GbE (BCM 5709c) | [hw 1] |
| R910 | 4U | Intel Xeon 7500/E7 series | 4x1GbE (BCM 5709c) or 2x10GbE + 2x1GbE (BCM 57771) | [hw 1] |
| T310 | Tower | Intel Xeon 3400 series | optional BCM 5709c (PCI-E) | [hw 1] |
| T610 | Tower | Intel Xeon 5500/5600 series | 2x1GbE (BCM 5709c) | [hw 1][hw 2] |
| T710 | Tower | Intel Xeon 5500/5600 series | 4x1GbE (BCM 5709c) | [hw 1][hw 2] |
Important Hardware Notices
- ↑ 1.00 1.01 1.02 1.03 1.04 1.05 1.06 1.07 1.08 1.09 1.10 1.11 1.12 1.13 When using a non-RHEL-5 kernel, it's highly recommended to emerge broadcom-netxtreme2 after installing your kernel, in order to use the latest drivers from Broadcom.com rather than the in-kernel bnx2 (1GbE) or bnx2x (10GbE) drivers. This will help resolve firmware initialization and other hardware compatibility issues that may result in your network interfaces being unavailable at boot or performing sub-optimally under load. See Kernel Compatibility for more information.
- ↑ 2.0 2.1 2.2 2.3 2.4 The Intel Xeon 5500 and 5600 series processors used in Dell PowerEdge 11G servers have known errata (bugs) related to C-states (CPU power saving states) that can and will result in unexpected and unpleasant server behavior in real-world, day-to-day operation. Intel has released CPU microcode updates in 2010 and early 2011 to address these issues. Be sure to update your BIOS to the most recent available from Dell. Dell includes Intel CPU microcode updates as part of their BIOS updates. BIOS 3.0.0 or greater is recommended. For more information on Intel Xeon 5500 errata, see Intel's Xeon Processor 5500 Series Specification Update, April 2011.
Updating Firmware
The most reliable method to update firmware is to use Dell Repository Manager. This program requires Windows but has the ability to make a bootable Linux ISO image that can update your server firmware in an efficient manner. The PowerEdge R710 also has a built-in "Unified Server Configurator" that can be used to update firmware in a pinch, but it is can take an extremely long time to download and apply server updates.
Use of the Dell Repository Manager to build a Linux bootable ISO image is the recommended method of updating Dell firmware. A step-by-step guide for using Dell Repository Manager can be found below:
Dell Repository Manager
Important: It is recommended that you download the latest Dell Repository Manager which can be downloaded following instructions in this thread post. It resolves issues creating ISOs under Windows 7.
Here's a complete list of steps to update Dell firmware using the Dell Repository Manager:
- Download Dell Repository Manager from http://ftp.dell.com/FOLDER00313115M/1/Dell_Repository_Manager_1.4.113.msi and install on a Windows system.
- Launch the program.
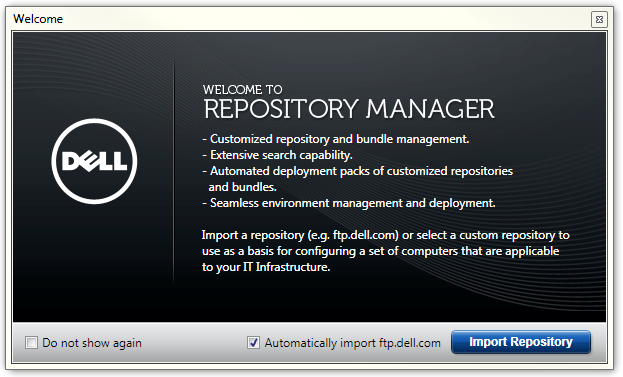
- In the main window, choose to automatically import ftp.dell.com, and click "Import Repository":
- Welcome: The Create/Load Repository dialog will open. Select "Create New Repository" and click "Next".
- Name and Description: Type in a name of your choice, such as "Dell R710", and click "Next".
- Select Repository: Select "(Server) ftp.dell.com" and click "Next".
- Select Form Factor: Select the type(s) of equipment you want to build a driver disk for and click "Next".
- Select OS: Select "Linux". Click "Next".
- Select Models: Choose the specific model of equipment ("PowerEdge R710", for example.) Click "Next".
- Select Bundle(s): Choose to "ONLY include most recent and custom bundle(s)". Click "Next".
- Additional Components: Select "Yes". Click "Next".
- Summary: click "Finish".
- "Please wait" will appear for a few minutes, and then the dialog will disappear.
- The "Bundles" tab will now be active with your bundle visible.
- Select your bundle by clicking the square check-box to the left of it.
- Click "Export" in the lower right corner of the main window, and click "Next" on the Welcome screen.
- Export Destination: Select "Deployment Media (Linux only) Export to ISO/Script format for deployment." Click "Next".
- At this point, you may be prompted to install a plugin. Install the plugin and click "Next".
- Select an output folder for the ISO, click "OK", and then "Next".
- Select Custom Script: Select "No" and click "Next".
- Click "Finish".
- Your ISO will take 5-10 minutes to build. The program will let you know when it's done.
- Burn ISO to CD-R/DVD-R.
- Insert burnt disc into server, reboot server, press F11 for boot menu and choose to boot from CD.
- The disc will boot. Select the first menu option to launch the firmware update process.
- The process will take 20-30 minutes to complete. Press Alt-F2 for a console if you get bored.
- When the firmware update process is complete, a message will appear on the screen. Hit Enter to reboot.

The disc can now be used to update other similar systems in your datacenter.
iDRAC6
iDRAC is the Dell Integrated Remote Access Controller, which is typically accessed via the dedicated management interface using a Web browswer.
Sometimes, the iDRAC firmware will not be successfully updated via the firmware CD-R created using the steps in the section above. This was experienced on our servers when attempting to update from iDRAC firmware 1.54 to 1.70. To work around this issue, you can log in directly to the iDRAC via a Web browser and update the iDRAC's firmware (just the iDRAC firmware itself, not the firmware of other system components) via its user interface.
To do this, follow these steps:
- Go to http://support.dell.com, and download the latest Dell iDRAC6 firmware. You will want to download the Windows executable format file, ie. iDRAC6_1.70_A02_FW_IMG.exe.
- Execute this file on a Windows machine. It is a self-extracting archive and will prompt you for a location to store the firmware. Choose a location and a file named firmimg.d6 will be extracted. This is the iDRAC firmware you will upload.
- Log in to the iDRAC using a Web browser. If updating from 1.54, use Google Chrome instead of Internet Explorer 9 to avoid issues.
- Select "Remote Access" (or in newer versions, "iDRAC Settings") from the menu on the left, and the "Update" tab at the top of the page.
- On this page, click the "Choose File" button and select the firmimg.d6 file extracted earlier.
- Click "Upload". Uploading the firmware will take a minute or two.
- Once the firmware image is uploaded, you will be able to click a button to update the firmware. You will be presented with a status page similar to this:
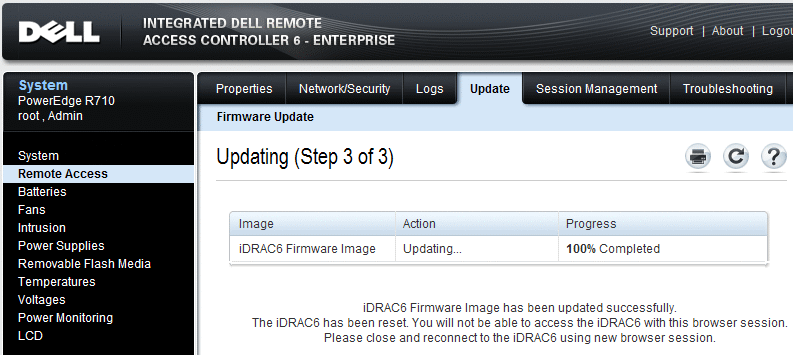
- Once the iDRAC firmware is 100% complete, you can reload the iDRAC Web page and log in to the new version of iDRAC.
- Note that because iDRAC is independent from the underlying hardware, your Linux system will typically not power cycle during this process, so it will still be available.

Kernel Compatibility
The following table documents kernel compatibility with the Dell PowerEdge R710 server, and is likely to apply to other PowerEdge 11G servers based on Intel Xeon 5500/5600 series processors.
Funtoo Linux kernel testing is performed on Dell PowerEdge R710 servers equipped with Intel 5500 series processors.
All kernels listed below were built by setting the binary USE variable and emerging, which causes full kernel sources as well as a binary kernel and initrd (built using genkernel) to be installed. Note that for the openvz-rhel5-stable kernel, udev must be downgraded to 146-r3 in order for the system to function properly after reboot. This can be accomplished by adding >=sys-fs/udev-147 to /etc/portage/package.mask and running emerge udev prior to booting your new kernel.
| Kernel | Version | Minimum Dell BIOS | Req'd USE flags | Stability | Req'd drivers | Req'd udev |
|---|---|---|---|---|---|---|
| openvz-rhel5-stable | 2.6.18.028.089.1 | 3.0.0[kernel 1] | binary | Excellent | Broadcom bnx2 driver module bundled with kernel appears to be OK | =sys-fs/udev-146* |
| openvz-rhel5-stable | 2.6.18.028.091.1 | 3.0.0[kernel 1] | binary | Excellent | Broadcom bnx2 driver module bundled with kernel appears to be OK | =sys-fs/udev-146* |
| ubuntu-server | 2.6.32.32.62 | 3.0.0[kernel 1] | binary | Excellent | emerge broadcom-netxtreme2 for reliable BCM5709+ support (integrated NIC) | N/A [kernel 2] |
| openvz-rhel6-stable | 2.6.32.014.1 | 3.0.0[kernel 1] | binary | Buggy, do not use | emerge broadcom-netxtreme2 for reliable BCM5709+ support (integrated NIC) | N/A [kernel 2] |
| openvz-rhel6-stable | 2.6.32.015.1 | 3.0.0[kernel 1] | binary | Buggy, do not use | emerge broadcom-netxtreme2 for reliable BCM5709+ support (integrated NIC) | N/A [kernel 2] |
| openvz-rhel6-stable | 2.6.32.016.1 | 3.0.0[kernel 1] | binary | Buggy, do not use | emerge broadcom-netxtreme2 for reliable BCM5709+ support (integrated NIC) | N/A [kernel 2] |
- ↑ 1.0 1.1 1.2 1.3 1.4 1.5 Without an up-to-date BIOS, you may experience system instability or a system clock that jumps forward (and back) 5 minutes for no apparent reason. Upgrading to at least Dell BIOS 3.0.0 should update Intel CPU microcode sufficiently to correct these issues.
- ↑ 2.0 2.1 2.2 2.3 Any standard Funtoo Linux udev version is fine.
Server Best Practices
This section contains a list of recommended programs, utilities and best practices for production servers.
Accurate System Time (NTP)
My favorite and recommended NTP client/server is net-misc/chrony. It is recommended for production servers:
# emerge chrony
# rc-update add chronyd default
Use something like the following for your /etc/chrony/chrony.conf:
server time.apple.com
maxupdateskew 100
driftfile /etc/chrony/chrony.drift
keyfile /etc/chrony/chrony.keys
commandkey 1
dumponexit
dumpdir /var/log/chrony
initstepslew 10 time.apple.com
logdir /var/log/chrony
log measurements statistics tracking
logchange 0.5
mailonchange me@emailprovider.com 0.5
rtcfile /etc/chrony/chrony.rtc
rtconutc
sched_priority 1
lock_all
Chronyd can then be started immediately by running rc to start all new services:
# rc
You should notice a marked improvement in your system clock's accuracy. If your system time was off by a significant amount, chronyd will gradually correct your clock while the system runs.
SMART Disk Monitoring
Emerge smartmontools and use an /etc/smartd.conf with these settings for a PERC 6/i with 5 physical disks installed:
/dev/sda -m myemail@foo.com -d megaraid,0
/dev/sda -m myemail@foo.com -d megaraid,1
/dev/sda -m myemail@foo.com -d megaraid,2
/dev/sda -m myemail@foo.com -d megaraid,3
/dev/sda -m myemail@foo.com -d megaraid,4
To figure out what configuration to use for your system, use the following command:
# smartctl -d megaraid,X --all /dev/sdY
Start using X=0 and Y=a, and keep incrementing X until you discover all physical disks backing sda. Then repeat with sdb, etc. until you discover all physical disks in your system. In typical configurations, you will have megaraid,0 thru megaraid,(num_physical_disks-1).
On Dell R910s with PERC H700, all physical disks are addressable through all /dev/sdY simultaneously, so there is no need to iterate through Y. ie: all of the same physical disks will be shown simultaneously for /dev/sda, /dev/sdb, /dev/sdc etc... so there is no need to repeat the steps for sdY+1 and onwards.