The Funtoo Linux project has transitioned to "Hobby Mode" and this wiki is now read-only.
Difference between revisions of "Libvirt"
A-schaefers (talk | contribs) |
A-schaefers (talk | contribs) |
||
| (147 intermediate revisions by 2 users not shown) | |||
| Line 1: | Line 1: | ||
{{Article | {{Article | ||
|Author=a-schaefers | |Author=a-schaefers | ||
| Line 4: | Line 5: | ||
==Introduction== | ==Introduction== | ||
This | |||
This page documents the configuration of KVM/Qemu using Libvirt with the GUI front-end Virt-Manager. | |||
An overview according to libvirt.org, the [libvirt] project: | An overview according to libvirt.org, the [libvirt] project: | ||
| Line 16: | Line 18: | ||
==Check for KVM hardware support== | ==Check for KVM hardware support== | ||
Verify the processor supports Intel Vt-x or AMD-V technology and that the necessary virtualization features are enabled within the BIOS. The following command should reveal if your hardware supports virtualization: | |||
{{console|body= | |||
$ LC_ALL=C lscpu | $ ##i##LC_ALL=C lscpu {{!}} grep Virt | ||
}} | |||
==Kernel configuration== | ==Kernel configuration== | ||
The default Funtoo kernel, | The default Funtoo kernel, sys-kernel/debian-sources, has the needed KVM virtualization and virtual networking features enabled by default and will not require any reconfiguration. Non debian-sources users will need to verify the necessary kernel features are turned on in order to run KVM virtual machines and use virtual networking. | ||
== | ==Install libvirt== | ||
Optionally build libvirt with policykit support which will allow non-root users to authenticate as root in order to manage | Optionally build libvirt with policykit support which will allow non-root users to authenticate as root in order to manage VMs and will also allow members of the libvirt group to manage VMs without using the root password. | ||
{{console|body= | |||
echo 'app-emulation/libvirt policykit' >> /etc/portage/package.use | $ ##i##echo 'app-emulation/libvirt policykit' >> /etc/portage/package.use | ||
}} | |||
For desktop VM usage | For desktop VM usage it is recommended to build app-emulation/qemu with spice support. The Spice protocols can be used to gain improved graphical and audio experience, clipboard-sharing and directory-sharing. | ||
{{console|body= | |||
echo 'app-emulation/qemu spice' >> /etc/portage/package.use | $ ##i##echo 'app-emulation/qemu spice' >> /etc/portage/package.use | ||
}} | |||
It | It's likely to need further USE flag changes in /etc/portage/package.use -- if it asks, add the changes needed in order to be emerged. | ||
{{console|body= | |||
emerge -av libvirt | $ ##i##emerge -av app-emulation/libvirt | ||
}} | |||
After libvirt is finished compiling, you will have installed libvirt and pulled-in all of its | After libvirt is finished compiling, you will have installed libvirt and pulled-in all of its necessary dependencies, such as app-emulation/qemu and also net-firewall/ebtables and net-dns/dnsmasq for the default NAT/DHCP networking. | ||
== | ==Enable the libvirtd service== | ||
Start the libvirtd service | Start the libvirtd service. | ||
{{console|body= | |||
$ ##i## rc-service libvirtd start | |||
}} | |||
Add the libvirtd service to the openrc default runlevel | Add the libvirtd service to the openrc default runlevel. | ||
{{console|body= | |||
$ ##i## rc-update add libvirtd | |||
}} | |||
== | ==Enable the "default" libvirt NAT== | ||
Set the virsh | Set the virsh network "default" to be autostarted by libvirtd. | ||
{{console|body= | |||
$ ##i## virsh net-autostart default | |||
}} | |||
Start the "default" virsh network | Start the "default" virsh network. | ||
{{console|body= | |||
$ ##i## virsh net-start default | |||
}} | |||
Restart the libvirtd service to ensure everything has taken effect. | Restart the libvirtd service to ensure everything has taken effect. | ||
{{console|body= | |||
$ ##i## rc-service libvirtd restart | |||
}} | |||
Use ifconfig to verify the default NAT's network interface is up. | |||
{{console|body= | |||
$ ##i## ifconfig | |||
}} | |||
... | |||
virbr0: flags=4099<UP,BROADCAST,MULTICAST> mtu 1500 | |||
inet 192.168.122.1 netmask 255.255.255.0 broadcast 192.168.122.255 | |||
ether 52:54:00:74:7a:ac txqueuelen 1000 (Ethernet) | |||
RX packets 6 bytes 737 (737.0 B) | |||
RX errors 0 dropped 5 overruns 0 frame 0 | |||
TX packets 0 bytes 0 (0.0 B) | |||
TX errors 0 dropped 0 overruns 0 carrier 0 collisions 0 | |||
... | |||
Notice the "default" libvirt NAT inserts its additional iptables rules automatically upon every libvirtd restart. | |||
{{console|body= | |||
$ ##i## iptables -S | |||
}} | |||
... | |||
-A FORWARD -d 192.168.122.0/24 -o virbr0 -m conntrack --ctstate RELATED,ESTABLISHED -j ACCEPT | -A FORWARD -d 192.168.122.0/24 -o virbr0 -m conntrack --ctstate RELATED,ESTABLISHED -j ACCEPT | ||
-A FORWARD -s 192.168.122.0/24 -i virbr0 -j ACCEPT | -A FORWARD -s 192.168.122.0/24 -i virbr0 -j ACCEPT | ||
| Line 106: | Line 123: | ||
==Most virsh commands require root privileges== | ==Most virsh commands require root privileges== | ||
Libvirt | Libvirt VMs are managed using the virsh cli and the GUI front-end Virt-Manager. Using these tools will require root privileges. | ||
Running as root | As noted from man(1) virsh, | ||
{{quote|"Most virsh commands require root privileges to run due to the communications channels used to talk to the hypervisor. Running as non root will return an error."}} | |||
virsh | Running as root, the following are some example virsh commands: | ||
virsh | {{console|body= | ||
$ ##i## virsh list --all | |||
}} | |||
virsh | {{console|body= | ||
$ ##i## virsh start foo | |||
}} | |||
{{console|body= | |||
$ ##i## virsh destroy foo | |||
}} | |||
If libvirt was built with polictykit support, non-root users can run the same example virsh commands by addressing qemu:///system and authenticating as root via policykit | If libvirt was built with polictykit support, non-root users can run the same example virsh commands by addressing qemu:///system and authenticating as root via policykit. | ||
virsh --connect qemu:///system list --all | {{console|body= | ||
$ ##i## virsh --connect qemu:///system list --all | |||
}} | |||
virsh --connect qemu:///system start foo | {{console|body= | ||
$ ##i## virsh --connect qemu:///system start foo | |||
}} | |||
virsh --connect qemu:///system destroy foo | {{console|body= | ||
$ ##i## virsh --connect qemu:///system destroy foo | |||
}} | |||
==Passwordless, non-root VM administration== | ==Passwordless, non-root VM administration== | ||
If libvirt was built with policykit support, | If libvirt was built with policykit support, add a user to the additional "libvirt" group in order to administrate Virtual Machines without authenticating as root. Log out and back in for these changes to take affect. | ||
gpasswd -a $USER libvirt | {{console|body=$ ##i## gpasswd -a $USER libvirt}} | ||
==Tell Qemu where the UEFI | ==Tell Qemu where the UEFI BIOS firmware is located== | ||
/etc/libvirt/qemu.conf | Edit /etc/libvirt/qemu.conf and include the following contents: | ||
<pre> | |||
nvram = [ | |||
"/usr/share/edk2-ovmf/OVMF_CODE.fd:/usr/share/edk2-ovmf/OVMF_VARS.fd" | |||
] | |||
</pre> | |||
== | ==Install Virt-Manager to create and configure VM templates== | ||
Libvirt VM Templates are configured using XML and it is | Libvirt VM Templates are configured using XML and it is recommended to install Virt-Manager in order to ease the virtual machine creation and configuration process. It may also be desirable to revisit the virsh commands later on, as it may be necessary to use them in order to make some advanced changes to XML templates that are not shown in the GUI Virt-Manager application. Using the virsh cli is also essential for doing work remotely where Virt-Manager may not be available. | ||
Make sure the | Make sure the gtk USE flag is enabled for Virt-Mananger, as it is a graphical application, and also polictykit, and then begin the emerge process: | ||
echo 'app-emulation/virt-manager gtk policykit' >> /etc/portage/package.use | {{console|body= | ||
$ ##i## echo 'app-emulation/virt-manager gtk policykit' >> /etc/portage/package.use | |||
}} | |||
It's likely to need further USE flag changes in /etc/portage/package.use -- if it asks, add the changes needed in order to be emerged. | |||
{{console|body= | |||
$ ##i## emerge -av app-emulation/virt-manager | |||
}} | |||
== Create a new Virtual Machine Template == | |||
[[File:01createvm.png|400px|Creating a new Virtual Machine Template]] | [[File:01createvm.png|400px|Creating a new Virtual Machine Template]] | ||
On first use of Virt-Manager, while browsing to find an ISO image, create a dedicated ISO "pool" which will be a directory on the filesystem where ISO files are stored. Select the "+" in order to "Add pool". After creating the ISO pool and moving ISO images into the directory, browse for your ISO images in your ISO pool. | |||
[[File:05isopoolimage.png|750px|Choose Volume]] | [[File:05isopoolimage.png|750px|Choose Volume]] | ||
== Customize configuration before VM install == | |||
During the | During the final step of VM template creation, it is a good idea to check the box "Customize Configuration Before Install," as it will allow, on the next screen, the option to choose which BIOS firmware will be used. After a BIOS is chosen for a VM template, it is unable to be changed without starting the creation process again from the beginning. | ||
[[File:09customizebefore.png|400px|Customize Configuration Before Install]] | [[File:09customizebefore.png|400px|Customize Configuration Before Install]] | ||
The default is | The default BIOS is seabios, which is a legacy BIOS. OVMF, a UEFI BIOS, is also available. When deciding on a chipset, i440FX is for emulation of older BIOS chipsets, and Q35 is for emulation of newer BIOS chipsets. It is recommended to use the default seabios unless a UEFI BIOS is needed. | ||
It is recommended to | |||
[[File:10choosebios.png|816px|Choose your | [[File:10choosebios.png|816px|Choose your BIOS from the customize configuration menu]] | ||
It is possible to return to the VM customization menu at any time by selecting a VM from the main Virt-Manager window, choosing "open" and then selecting "Details" from the VMs dropdown menu. | |||
Q35 BIOS will not work with IDE, remove the | == Other considerations in the customization menu == | ||
=== The Q35 BIOS chipset will not work with IDE === | |||
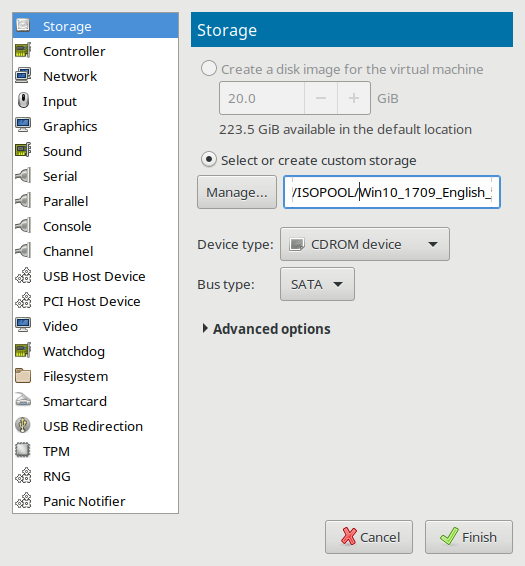
If using the Q35 chipset, remove the IDE Storage devices and select "Add Hardware," in the "Storage" section, select SATA and add new SATA Storage devices instead. | |||
It is also important to decide between using the qcow2 or raw storage types. Qcow2 allows for snapshotting with rollbacks and is sparse provisioned. Raw does not have the features of qcow2, but may have better performance under some circumstances. | |||
[[File:11newsatacdrom.png|525px|Adding a new SATA cdrom Device and loading it with a windows 10 ISO image]] | [[File:11newsatacdrom.png|525px|Adding a new SATA cdrom Device and loading it with a windows 10 ISO image]] | ||
=== How to use SCSI Storage Devices with the Virtio SCSI Disk Controller === | |||
While adding virtual storage hardware, it is an excellent time to choose the disk "Device type" of "SCSI" which will use the Redhat passthrough "Virtio SCSI" disk controller for improved I/O performance. | |||
ZFS users can also use a sparse provisioned ZVOL which can be addressed in the "Select or create custom storage" textbox as follows: | |||
{{console|body= | |||
/dev/zvol/tank/VOLNAME | |||
}} | |||
The virtio guest driver for taking advantage of the "Virtio SCSI" disk controller is included by default in Linux and FreeBSD kernels. Windows will be unable to see the Virtio SCSI storage disk and therefore unable to install until you load the Redhat Virtio SCSI driver during the Windows install process. (Windows installers include a menu that is able to load drivers during installation.) The RedHat Virtio SCSI driver for Windows is available to [https://fedorapeople.org/groups/virt/virtio-win/direct-downloads/archive-virtio/virtio-win-0.1.149-2 download as an ISO image]. | |||
[[File:11redoingstorage.png|525px|Adding a new SCSI Storage Device and addressing it to a preconfigured ZVOL]] | [[File:11redoingstorage.png|525px|Adding a new SCSI Storage Device and addressing it to a preconfigured ZVOL]] | ||
Virt-Manager configures | === About the Virt-Manager defaults === | ||
Virt-Manager configures the Spice server with QXL video, ich6 sound, USB redirectors and shared clipboard by default. These are all generally good things to have for graphical VMs, but depending on the user application, some may opt to remove or change these devices away from defaults. | |||
== Begin Installation == | |||
When ready to begin, choose "Begin Installation", Virt-Manager's equivalent of the "virt-install" command. | |||
[[File:12begininstallation.png|681px|Windows 10 Virtual Machine]] | |||
After successful installation of an OS, it is a good idea to install and enable the app-emulation/spice-vdagent service on graphical guests. If it is a Windows guest, a Spice executeable can be downloaded from the official Spice [https://www.spice-space.org/download.html downloads page]. | |||
== XML Template editing using "virsh edit" == | |||
=== Allow sparse provisioned guests to trim the filesystem and return unused space to the host === | |||
Some features can only be changed by editing the XML template directly. This example shows an XML template that was originally generated using Virt-Manager, but by using the "virsh edit" command, has been modified on line 42 with the added parameter of discard='unmap' which allows sparse provisioned guest VMs to trim the filesystem and return unused space to the host. | |||
[[File:Virsh-edit-xml-example.png|798px|Editing XML templates manually with virsh edit]] | |||
== Troubleshooting == | |||
Can't get beyond the | Can't get beyond the BIOS screen? Check if the boot devices are enabled and in the correct order. Also check if the CDROM has an ISO loaded! It may also be possible the ISO installation media only supports legacy BIOS. | ||
== | ==Links == | ||
* https://www.linux-kvm.org | |||
* https://www.qemu.org | * https://www.qemu.org | ||
* https://libvirt.org | * https://libvirt.org | ||
* https://www.spice-space.org | |||
* https://virt-manager.org | * https://virt-manager.org | ||
* https:// | * https://libvirt.org/docs.html | ||
* https://wiki.archlinux.org/index.php/Libvirt | |||
* https://wiki.archlinux.org/index.php/PCI_passthrough_via_OVMF | |||
[[Category:Virtualization]] | |||
[[Category:KVM]] | |||
Latest revision as of 08:45, May 25, 2018
Introduction
This page documents the configuration of KVM/Qemu using Libvirt with the GUI front-end Virt-Manager.
An overview according to libvirt.org, the [libvirt] project:
- is a toolkit to manage virtualization platforms
- is accessible from C, Python, Perl, Java and more
- is licensed under open source licenses
- supports KVM, QEMU, Xen, Virtuozzo, VMWare ESX, LXC, BHyve and more
- targets Linux, FreeBSD, Windows and OS-X
- is used by many applications
Check for KVM hardware support
Verify the processor supports Intel Vt-x or AMD-V technology and that the necessary virtualization features are enabled within the BIOS. The following command should reveal if your hardware supports virtualization:
user $ LC_ALL=C lscpu | grep Virt
Kernel configuration
The default Funtoo kernel, sys-kernel/debian-sources, has the needed KVM virtualization and virtual networking features enabled by default and will not require any reconfiguration. Non debian-sources users will need to verify the necessary kernel features are turned on in order to run KVM virtual machines and use virtual networking.
Install libvirt
Optionally build libvirt with policykit support which will allow non-root users to authenticate as root in order to manage VMs and will also allow members of the libvirt group to manage VMs without using the root password.
user $ echo 'app-emulation/libvirt policykit' >> /etc/portage/package.use
For desktop VM usage it is recommended to build app-emulation/qemu with spice support. The Spice protocols can be used to gain improved graphical and audio experience, clipboard-sharing and directory-sharing.
user $ echo 'app-emulation/qemu spice' >> /etc/portage/package.use
It's likely to need further USE flag changes in /etc/portage/package.use -- if it asks, add the changes needed in order to be emerged.
user $ emerge -av app-emulation/libvirt
After libvirt is finished compiling, you will have installed libvirt and pulled-in all of its necessary dependencies, such as app-emulation/qemu and also net-firewall/ebtables and net-dns/dnsmasq for the default NAT/DHCP networking.
Enable the libvirtd service
Start the libvirtd service.
user $ rc-service libvirtd start
Add the libvirtd service to the openrc default runlevel.
user $ rc-update add libvirtd
Enable the "default" libvirt NAT
Set the virsh network "default" to be autostarted by libvirtd.
user $ virsh net-autostart default
Start the "default" virsh network.
user $ virsh net-start default
Restart the libvirtd service to ensure everything has taken effect.
user $ rc-service libvirtd restart
Use ifconfig to verify the default NAT's network interface is up.
user $ ifconfig
   ...
   virbr0: flags=4099<UP,BROADCAST,MULTICAST>  mtu 1500
   inet 192.168.122.1  netmask 255.255.255.0  broadcast 192.168.122.255
   ether 52:54:00:74:7a:ac  txqueuelen 1000  (Ethernet)
   RX packets 6  bytes 737 (737.0 B)
   RX errors 0  dropped 5  overruns 0  frame 0
   TX packets 0  bytes 0 (0.0 B)
   TX errors 0  dropped 0 overruns 0  carrier 0  collisions 0
   ...
Notice the "default" libvirt NAT inserts its additional iptables rules automatically upon every libvirtd restart.
user $ iptables -S
   ...
   -A FORWARD -d 192.168.122.0/24 -o virbr0 -m conntrack --ctstate RELATED,ESTABLISHED -j ACCEPT
   -A FORWARD -s 192.168.122.0/24 -i virbr0 -j ACCEPT
   -A FORWARD -i virbr0 -o virbr0 -j ACCEPT
   -A FORWARD -o virbr0 -j REJECT --reject-with icmp-port-unreachable
   -A FORWARD -i virbr0 -j REJECT --reject-with icmp-port-unreachable
   -A FORWARD -d 192.168.122.0/24 -o virbr0 -m conntrack --ctstate RELATED,ESTABLISHED -j ACCEPT
   -A FORWARD -s 192.168.122.0/24 -i virbr0 -j ACCEPT
   -A FORWARD -i virbr0 -o virbr0 -j ACCEPT
   -A FORWARD -o virbr0 -j REJECT --reject-with icmp-port-unreachable
   -A FORWARD -i virbr0 -j REJECT --reject-with icmp-port-unreachable
   -A FORWARD -d 192.168.122.0/24 -o virbr0 -m conntrack --ctstate RELATED,ESTABLISHED -j ACCEPT
   -A FORWARD -s 192.168.122.0/24 -i virbr0 -j ACCEPT
   -A FORWARD -i virbr0 -o virbr0 -j ACCEPT
   -A FORWARD -o virbr0 -j REJECT --reject-with icmp-port-unreachable
   -A FORWARD -i virbr0 -j REJECT --reject-with icmp-port-unreachable
   -A OUTPUT -o virbr0 -p udp -m udp --dport 68 -j ACCEPT
   -A OUTPUT -o virbr0 -p udp -m udp --dport 68 -j ACCEPT
   -A OUTPUT -o virbr0 -p udp -m udp --dport 68 -j ACCEPT
Most virsh commands require root privileges
Libvirt VMs are managed using the virsh cli and the GUI front-end Virt-Manager. Using these tools will require root privileges.
As noted from man(1) virsh, Template:Quote
Running as root, the following are some example virsh commands:
user $ virsh list --all
user $ virsh start foo
user $ virsh destroy foo
If libvirt was built with polictykit support, non-root users can run the same example virsh commands by addressing qemu:///system and authenticating as root via policykit.
user $ virsh --connect qemu:///system list --all
user $ virsh --connect qemu:///system start foo
user $ virsh --connect qemu:///system destroy foo
Passwordless, non-root VM administration
If libvirt was built with policykit support, add a user to the additional "libvirt" group in order to administrate Virtual Machines without authenticating as root. Log out and back in for these changes to take affect.
user $ gpasswd -a $USER libvirt
Tell Qemu where the UEFI BIOS firmware is located
Edit /etc/libvirt/qemu.conf and include the following contents:
nvram = [
    "/usr/share/edk2-ovmf/OVMF_CODE.fd:/usr/share/edk2-ovmf/OVMF_VARS.fd"
]
Install Virt-Manager to create and configure VM templates
Libvirt VM Templates are configured using XML and it is recommended to install Virt-Manager in order to ease the virtual machine creation and configuration process. It may also be desirable to revisit the virsh commands later on, as it may be necessary to use them in order to make some advanced changes to XML templates that are not shown in the GUI Virt-Manager application. Using the virsh cli is also essential for doing work remotely where Virt-Manager may not be available.
Make sure the gtk USE flag is enabled for Virt-Mananger, as it is a graphical application, and also polictykit, and then begin the emerge process:
user $ echo 'app-emulation/virt-manager gtk policykit' >> /etc/portage/package.use
It's likely to need further USE flag changes in /etc/portage/package.use -- if it asks, add the changes needed in order to be emerged.
user $ emerge -av app-emulation/virt-manager
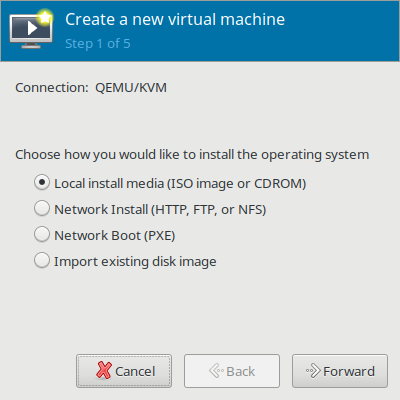
Create a new Virtual Machine Template
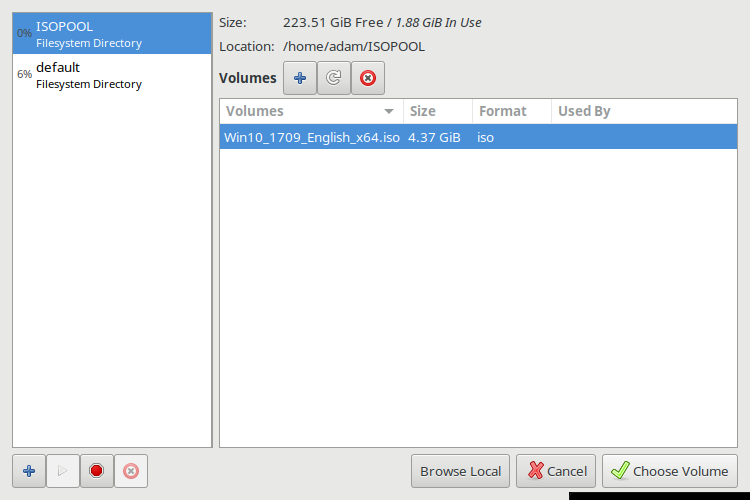
On first use of Virt-Manager, while browsing to find an ISO image, create a dedicated ISO "pool" which will be a directory on the filesystem where ISO files are stored. Select the "+" in order to "Add pool". After creating the ISO pool and moving ISO images into the directory, browse for your ISO images in your ISO pool.
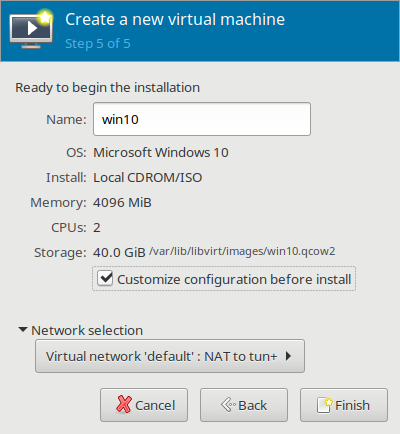
Customize configuration before VM install
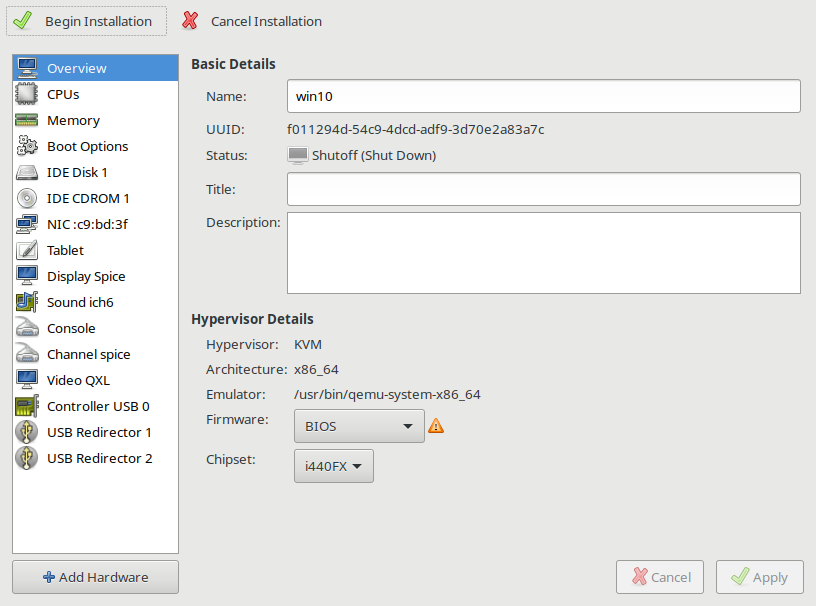
During the final step of VM template creation, it is a good idea to check the box "Customize Configuration Before Install," as it will allow, on the next screen, the option to choose which BIOS firmware will be used. After a BIOS is chosen for a VM template, it is unable to be changed without starting the creation process again from the beginning.
The default BIOS is seabios, which is a legacy BIOS. OVMF, a UEFI BIOS, is also available. When deciding on a chipset, i440FX is for emulation of older BIOS chipsets, and Q35 is for emulation of newer BIOS chipsets. It is recommended to use the default seabios unless a UEFI BIOS is needed.
It is possible to return to the VM customization menu at any time by selecting a VM from the main Virt-Manager window, choosing "open" and then selecting "Details" from the VMs dropdown menu.
The Q35 BIOS chipset will not work with IDE
If using the Q35 chipset, remove the IDE Storage devices and select "Add Hardware," in the "Storage" section, select SATA and add new SATA Storage devices instead.
It is also important to decide between using the qcow2 or raw storage types. Qcow2 allows for snapshotting with rollbacks and is sparse provisioned. Raw does not have the features of qcow2, but may have better performance under some circumstances.
How to use SCSI Storage Devices with the Virtio SCSI Disk Controller
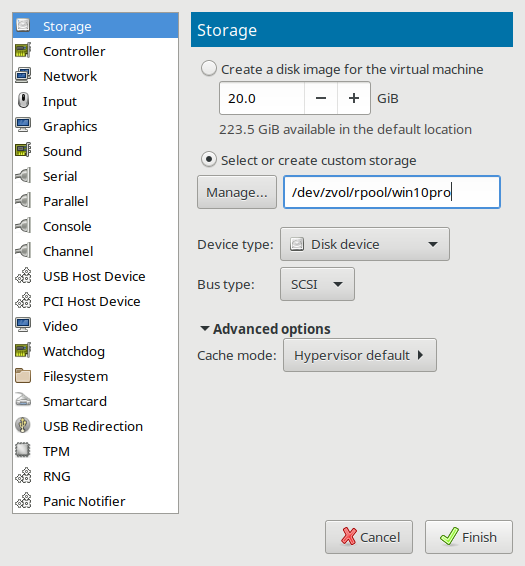
While adding virtual storage hardware, it is an excellent time to choose the disk "Device type" of "SCSI" which will use the Redhat passthrough "Virtio SCSI" disk controller for improved I/O performance.
ZFS users can also use a sparse provisioned ZVOL which can be addressed in the "Select or create custom storage" textbox as follows:
/dev/zvol/tank/VOLNAME
The virtio guest driver for taking advantage of the "Virtio SCSI" disk controller is included by default in Linux and FreeBSD kernels. Windows will be unable to see the Virtio SCSI storage disk and therefore unable to install until you load the Redhat Virtio SCSI driver during the Windows install process. (Windows installers include a menu that is able to load drivers during installation.) The RedHat Virtio SCSI driver for Windows is available to download as an ISO image.
About the Virt-Manager defaults
Virt-Manager configures the Spice server with QXL video, ich6 sound, USB redirectors and shared clipboard by default. These are all generally good things to have for graphical VMs, but depending on the user application, some may opt to remove or change these devices away from defaults.
Begin Installation
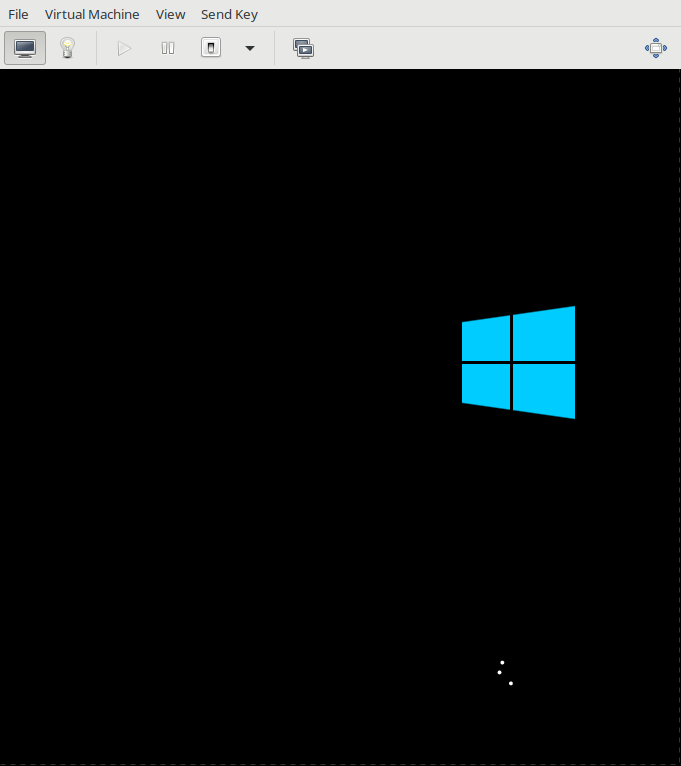
When ready to begin, choose "Begin Installation", Virt-Manager's equivalent of the "virt-install" command.
After successful installation of an OS, it is a good idea to install and enable the app-emulation/spice-vdagent service on graphical guests. If it is a Windows guest, a Spice executeable can be downloaded from the official Spice downloads page.
XML Template editing using "virsh edit"
Allow sparse provisioned guests to trim the filesystem and return unused space to the host
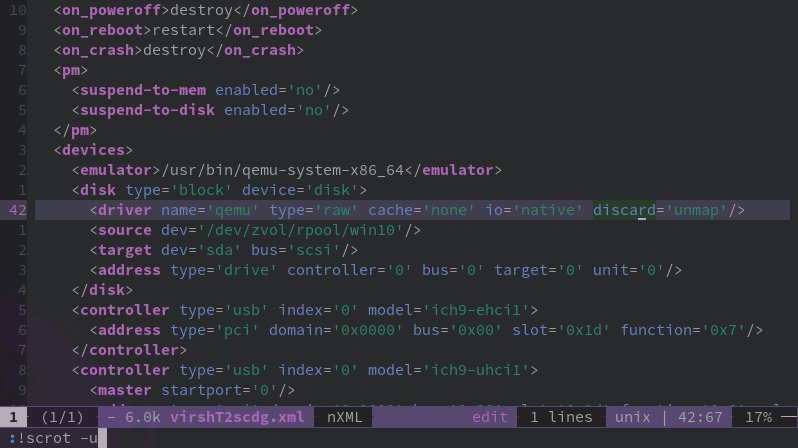
Some features can only be changed by editing the XML template directly. This example shows an XML template that was originally generated using Virt-Manager, but by using the "virsh edit" command, has been modified on line 42 with the added parameter of discard='unmap' which allows sparse provisioned guest VMs to trim the filesystem and return unused space to the host.
Troubleshooting
Can't get beyond the BIOS screen? Check if the boot devices are enabled and in the correct order. Also check if the CDROM has an ISO loaded! It may also be possible the ISO installation media only supports legacy BIOS.
